
Nota Bene: The pace of progress is quite fast in this area so you might find quite a few changes in things like capabilities and user interfaces. In general, please do remember that these hints are intended to be little tips and not explicit directions and you should always research your own solutions instead of thinking of these tips as rigid tutorial, step-by-step directions.
Our class can get quite frustrating, especially for students who don't have an extensive background in programming. The best approach to dealing with issues and errors in such cases is to start with very simple but fully functional code and then slowly adding changes to avoid an accumulation of errors.
The overall approach I might recommend is:
If you still run into issues, the next step would be to search for the specific error online to see if there are helpful posts on stackoverflow or other such sites on the Web. If that fails, as well, you can post in the discussion forums online with the following:
As mentioned above, one of the most effective ways to deal with errors is to search for them on Google! E.g., if you get an IOError (like 5 or 110), a very good technique to troubleshoot these errors is to look for them on Google; e.g., you can search for actual parts of the error produced by putting those parts in quotes, as below:
"Home_Weather_Display.py" "IOError: 5" setRGB(0,255,0)
And the first link points to the IOError 5 with some great tips to fix it:
https://forum.dexterindustries.com/t/home-weather-display-rgb-error/6048/2
If you're getting IOErrors, you should likely also confirm your connection, as per the following which was in response to an IOError 110:
https://forum.dexterindustries.com/t/home-weather-display-error/3580
At this point, you might get an additional error about the inability to find grove_rgb_lcd; if you again search Google for that specific error, the first link will probably help you fix the issue here:
https://forum.dexterindustries.com/t/solved-importerror-no-module-named-grove-rgb-lcd/3736
You can then run sudo curl -kL dexterindustries.com/update_grovepi | bash which runs through a bunch of installs but might not fix the problem fully. For the final part of the solution, you'll likely have to copy the grove_rgb_lcd.py file over to the same location as the project (e.g., the Home_Weather_Display folder) as discussed here: https://forum.dexterindustries.com/t/home-weather-display-error-with-the-grovepi/4822/7
E.g., you might want to do something appropriate on your particular installation like
sudo cp ~/Desktop/GrovePi/Software/Python/grove_rgb_lcd/grove_rgb_lcd.py ~/Desktop/GrovePi/Projects/Home_Weather_Display
As you run the python program in Module 1, you might get an import error like this:
Traceback (Most Recent Call Last): File "Home_Weather_Display.py", line 40, in from grovepi import * Import Error: no module named grovepi
The best thing to do when you get any error is to search google for that exact error. E.g., when you search for that error above ("Import Error: no module named grovepi"), the first link suggests what the issue is likely to be and how to fix it.
In this case, the issue is likely that you're using Python 3.x instead of Python 2.7.x. If you are already using Python 2.7, then the issue is likely as discussed here:
https://forum.dexterindustries.com/t/no-module-named-grovepi-solved/382
You can fix that error by running sudo python setup.py install in the Python folder as mentioned in the solution by Karan there.
pip3 install paho-mqtt python-etcd
Reference: here is a great reference for installing the Mosquitto MQTT Broker on Pi with Websockets: https://xperimentia.com/2015/08/20/installing-mosquitto-mqtt-broker-on-raspberry-pi-with-websockets/
As you start to install Mosquitto, you might get some errors after typing this command:
sudo apt-get install mosquitto mosquitto-clients
The errors might be something like this:
The following packages have unmet dependencies:
mosquitto : Depends: libssl1.0.0 (>= 1.0.1) but it is not installable
Depends: libwebsockets3 (>= 1.2) but it is not installable
mosquitto-clients : Depends: libmosquitto1 (= 1.4.15-0mosquitto3~jessie1) but it is not going to be installed
E: Unable to correct problems, you have held broken packages.
The issue is that your installation of Raspbian might update automatically from "Jessie" to "Stretch" which, from the forums, points to part of the problem. The repository for Jessie wouldn't pull the necessary dependencies so you'll have to manually get them and install them. You can confirm if you're on Stretch by checking your OS version:
cat /etc/os-release
If you are on Stretch, you can follow some of the tips in this article, especially the bits about checking the versions of installed packages under the installation heading:
https://www.eclipse.org/forums/index.php?t=msg&th=1089302&goto=1773991&
The main fix will be from a comment by sevos on 2017-10-11 in this thread:
https://github.com/eclipse/mosquitto/issues/529
This will likely require you to issue the following commands:
wget http://ftp.us.debian.org/debian/pool/main/o/openssl/libssl1.0.0_1.0.2l-1~bpo8+1_armhf.deb
wget http://ftp.us.debian.org/debian/pool/main/libw/libwebsockets/libwebsockets3_1.2.2-1_armhf.deb
sudo dpkg -i libssl1.0.0_1.0.2l-1~bpo8+1_armhf.deb
sudo dpkg -i libwebsockets3_1.2.2-1_armhf.deb
Finally, you can then issue this command:
sudo wget http://repo.mosquitto.org/debian/mosquitto-jessie.list (OPTIONAL)
sudo apt-get update (OPTIONAL)
sudo apt-get install mosquitto mosquitto-clients
sudo service mosquitto start
The package names are out of date so you might have to navigate to the parent folder in a web browser and find the closest match to the specified package, making sure to download the armhf architecture version and the appropriate libwebsockets8 package based on the instructions in the eclipse.org post, for example. After a successful installation, you should be able to start the service and run through the tests to verify the installation.
This might also result in some extra list files (e.g., if you tried the unsuccessful installations multiple times), you can remove those extra invalid files if they bother you by doing something like:
sudo rm mosquitto-jessie.list.1
change the number for as many installs you have (ex: 14)
the directory should be
/etc/apt/sources.list.d
The /etc/apt/sources.d is the location for configuring repositories for packages in "drop files". In other words, any file you drop into that directory is included in the configuration.
If it doesn't let you remove them, you may have to change to that directory to remove each one. To graphically see how many extra files you have, just click on the file icon at the top right, and then follow the directory path. each file will be labeled the same, but with a number on the end. any of the ...Jessie.list.X are copies of the actual file. you can delete all of those from the command line. As a worst case, you can do a
sudo rm mosquitto-jesse.list
sudo apt-get update
Mosquitto is now also part of the standard Debian Stretch repos; if that's the case for you, you can skip these steps:
wget http://repo.mosquitto.org/debian/mosquitto-repo.gpg.key
sudo apt-key add mosquitto-repo.gpg.key
rm mosquitto-repo.gpg.key
cd /etc/apt/sources.list.d/
#sudo wget http://repo.mosquitto.org/debian/mosquitto-jessie.list
sudo wget http://repo.mosquitto.org/debian/mosquitto-stretch.list
And only do these steps and it should be okay:
sudo apt-get update
sudo apt-get install mosquitto mosquitto-clients
sudo service mosquitto start
But, of course, your mileage may vary. :) Here's a link to a video for installing Mosquitto on Stretch using the standard repos:
https://www.youtube.com/watch?v=AsDHEDbyLfg
If you need to install Mosquitto on the Buster distro, please check out this link: https://stevessmarthomeguide.com/install-mosquitto-raspberry-pi/ The main change should be using mosquitto-buster.list instead but you might have to try a few troubleshooting steps depending on your particular configuration and installation.
You should test your Mosquitto installation as per the following:
import paho.mqtt.client as mqtt
local_client = mqtt.Client()
local_client.connect("localhost")
local_client.loop_start()
local_client.publish("hello/world", "Hi there, I am a python MQTTclient!")
raw_input("Hello sent, type enter to continue")
Example code is in the GrovePi/Software/Python directory wherever you installed the GrovePi software and also the mqtt_client_test.py code can be transferred to a copy of your weather display code and tweaked to write that data to mqtt.
Here are some great references for getting started wtih MQTT and private/public brokers:
This link has a great tutorial on how to get started with Node-Red:
https://randomnerdtutorials.com/getting-started-with-node-red-on-raspberry-pi/,
including a simple installation approach using curl:
bash <(curl -sL https://raw.githubusercontent.com/node-red/raspbian-deb-package/master/resources/update-nodejs-and-nodered)
For Buster, you can try the following:
bash <(curl -sL https://raw.githubusercontent.com/node-red/linux-installers/master/deb/update-nodejs-and-nodered) --node14
See more here: https://nodered.org/docs/getting-started/raspberrypi
and https://github.com/node-red/linux-installers/blob/master/deb/update-nodejs-and-nodered
bash <(curl -sL https://raw.githubusercontent.com/node-red/linux-installers/master/deb/update-nodejs-and-nodered)
Here are some potentially helpful videos, as well:
Node-RED's official API guide to writing functions: https://nodered.org/docs/writing-functions
The easiest way to install Node-RED is to use the node package
manager, npm, that comes with Node.js. We'll use npm to
install additional UI nodes to Node-RED in the next module. So you
could, for example, use the GrovePi nodes for Node-RED (which are
available here: https://flows.nodered.org/node/node-red-contrib-grovepi)
to interact with our sensors but, instead, we'll create nodes that
will interact with those sensors via MQTT so we can extend our
approach later on to control the Raspberry Pi from remote and not just
locally, as we would have to with the GrovePi nodes for Node-Red.
Nota Bene: npm might not be installed on your
system by default so you'd have to install npm first in order to
install Node-RED. The main note here would be to check if the Node.js
version on your RPi is too old (e.g., 10.x) to support npm. The
following page should let you install the correct version Node.JS,
npm, and Node-RED, all with one command: https://nodered.org/docs/getting-started/raspberrypi
If you have issues with the nodered installation and especially the npm installation due to unmet dependenices, you can take the old Ubuntu-esque approach:
sudo apt-get remove nodejs npm ## remove existing nodejs and npm packages
sudo apt-get install curl
curl -sL https://deb.nodesource.com/setup_6.x | sudo -E bash -
sudo apt-get install -y nodejs
Or, if you want the latest approach, follow the approach at https://www.digitalocean.com/community/tutorials/how-to-install-node-js-on-debian-9
sudo apt update
sudo apt install curl
cd ~
curl -sL https://deb.nodesource.com/setup_10.x -o nodesource_setup.sh
sudo bash nodesource_setup.sh
sudo apt install nodejs
sudo apt install build-essential
You might need to add the
-y option to install dependencies, as well.
There might be an issue with installation of the node-red-contrib-graphs package, which contains the IoT Datasource node. If you have trouble installing it, please try leaving off the utf-8-validate package by using the --no-optional switch in the npm install. You can read more about it here: https://discourse.nodered.org/t/problems-with-a-few-nodes-fallback-rebuilding-utf-8-validate-serialport-in-node-js-v10-15-1/7868/3 and install the node from here https://github.com/IBM-IoT/node-red-contrib-graphs
You can use the following to parse out integer values:
msg.payload = JSON.parse(msg.payload.blue)
return msg;
Here is a reference for JSON parsing: Working with JSON Data And JavaScript Objects in Node-Red
This part of the directions might be confusing: "Since gauges take a single data point this will require you to define two more data sources, one for Temperature and one for Humidity. It will also require you to write at least one custom function (in Javascript, see the info in the function node and) to extract the data Writing Functions from the original Temperature and Humidity message payload. In total, you will be adding two function nodes and two data source nodes to the flow."
As with all things in computation (and physics), there are numerous ways to approach activities like this and if you've developed a solution that works, I'd consider that success. One approach to solution is writing the right custom function in JavaScript.
The need for the custom function was due to the gauge only recognizing a single data point and the datasource node recognizing the entire data field. In those instances, if you try to connect the json node directly to the datasource node and configure the datasource node to only take a certain data point, you might find that you either receive no output or only the first data point on your dashboard. In this case, flowing variables directly to the datasource node would also produce no output because it only recognizes a json object.
Using the custom function, however, you can take a single data point from the original json object and create a new object with only that data point as the message payload. Here's an example of what you might do for humidity, in this case:
var humMsg = {payload: msg.payload.data.humidity};
var tmStmp = {payload: msg.payload.timestamp};
return {
      "payload": {
              "timestamp": tmStmp,
              "data": humMsg
      }
};
In terms of converting temperature to celsius, you can do it on the python side or on the JavaScript side using something like this:
// Sample payload
// {"timestamp": 1519609945872, "data": {"range": 511, "degrees": 222.0, "temperature": 19.0, "humidity": 47.0}}
temperature = msg.payload.data.temperature
for (var key in msg.payload.data) {
    //if (key !== "temperature")
    delete msg.payload.data[key];
}
msg.payload.data.temperature_c = temperature.toFixed(1);
msg.payload.data.temperature_f = (temperature * 9 / 5 + 32).toFixed(1);
return msg;
You can do this for each sensor and connect a datasource node to each with the default setting for data field and get the expected output.
Another approach is to just add a separate data set in the dictionary (perhaps calling it 'displaydata' in your code). In that way, you would have:
'displaydata': 'timestamp', 'temp_hum', 'temp', 'hum', 'rotary_angle''temp_hum' would have two variables defined and 'rotary_angle' with four, whereas both 'temp' and 'hum' would only have one.
Then you can create the four datasources for the dashboard, connect them all to the json node, and then create the charts based on the appropriate datasource. If you approach it this way, you won't have to write a custom javascript code if you just reiterate the variables in defining the python object. The only redundancy here is that although you are not truly duplicating info given, that it is pulling temp and humidty from the same variable within the loop.
If you're having issues with publishing your temperature/humidity to Node-Red, you might want to ensure everything is setup correctly. For starters, please check to see if you are able to subscribe to the topic using the terminal, e.g., using the mosquitto_sub -h command as shown below:
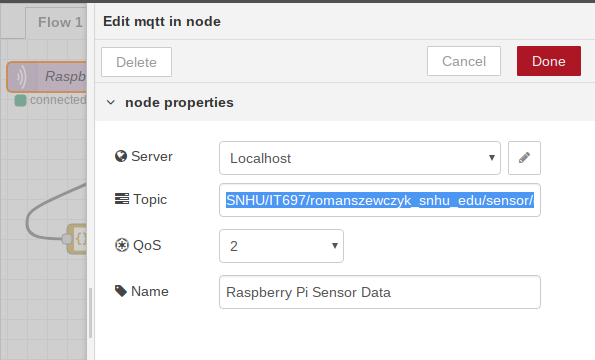
Second, please ensure that the topic title (the -t SCHOOL/COURSE/...) matches the title to which you are publishing in the MQTT node on Node-RED.
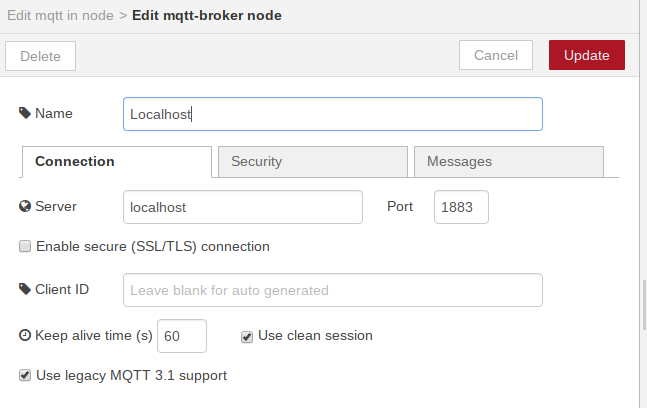
Edit the MQTT Input node called Raspberry Pi Sensor Data:
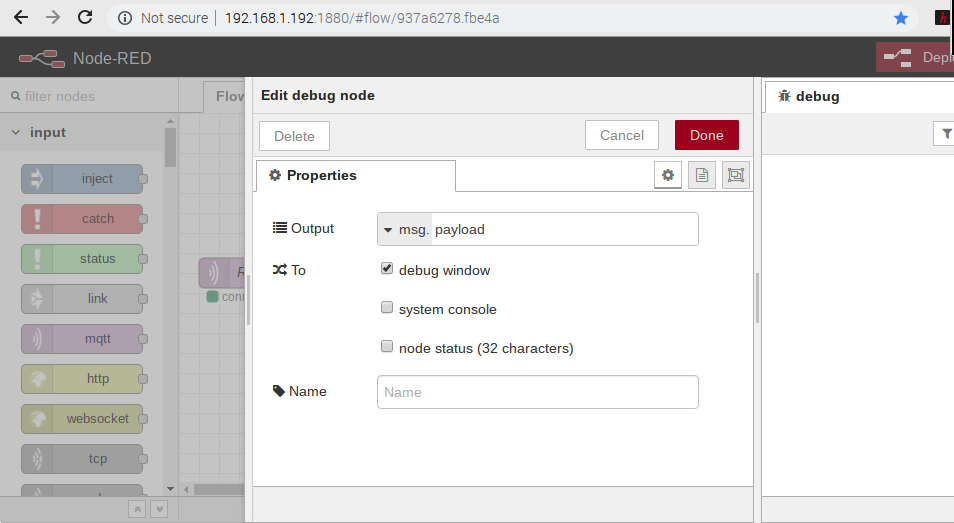
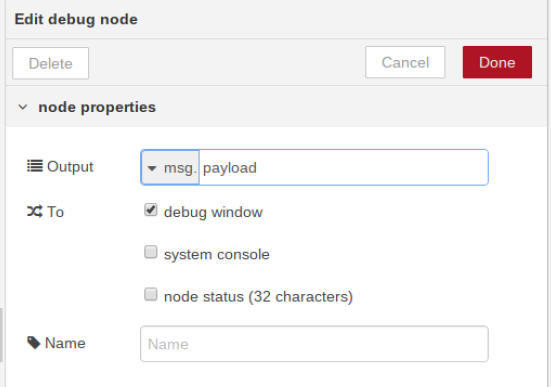
Edit the Debug node:
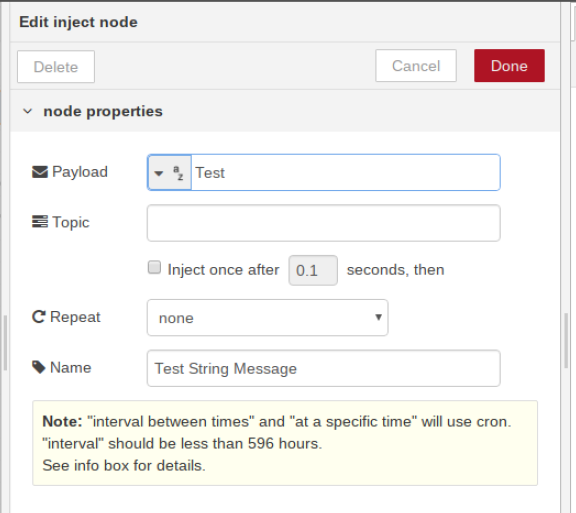
As an alternative to ensure your Node-RED is working, you could also build everything on Node-RED using the following nodes:
From input, add these two nodes:
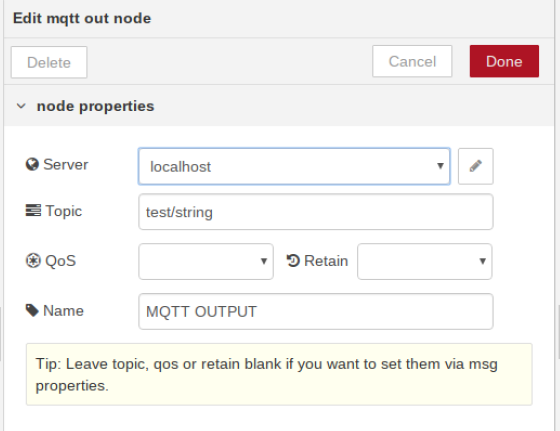
From output, add these two nodes:
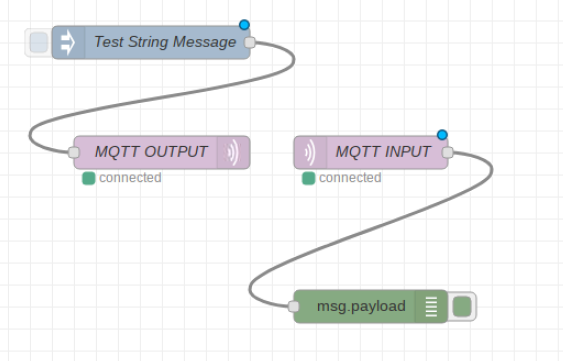
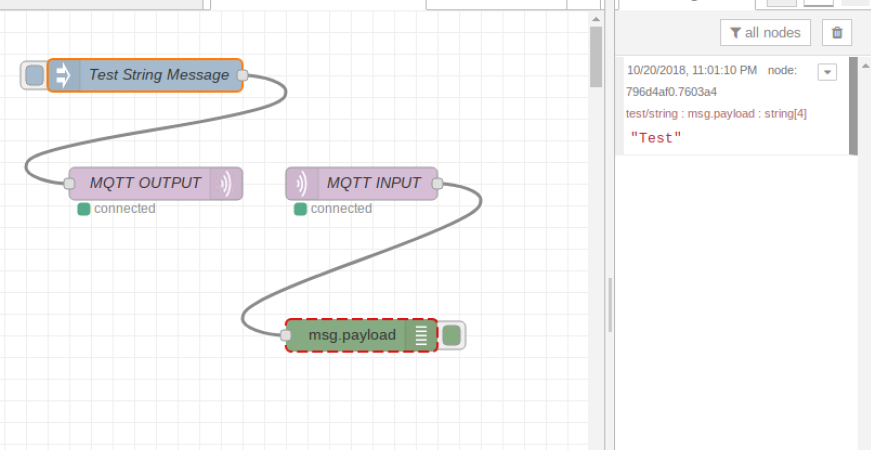
Connect the inject input node ("Test String Message") to the mqtt output node ("MQTT OUTPUT") as follows:
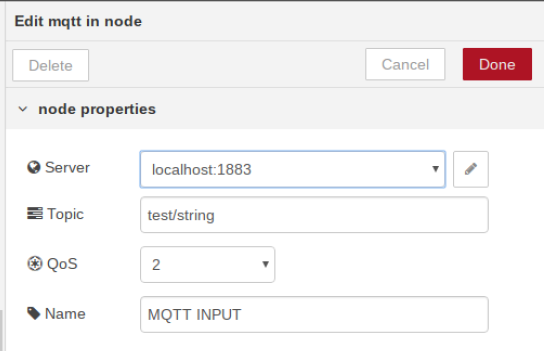
Connect the mqtt input node ("MQTT INPUT") to the debug output node ("msg.payload") as follows:
Then, hit "Deploy" and then hit the button as highlighted bellow
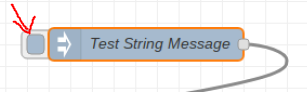
You should see your string message, Test, in the panel to the right:
Eventually, please ensure your JSON message payload is formatted properly in Python, as well:
#JSON
sensor_data = {
  'timestamp': 0,
  'data': {
    'temperature': 0,
    'humidity': 0
  }
}

sensor_data['timestamp'] = integer_milliseconds_since_epoch
sensor_data['data']['temperature'] = tempF
sensor_data['data']['humidity'] = hum

# Print the data locally:
print(json.dumps(sensor_data))
If everything in Node-RED works until you put the slider node in (i.e., it deploys but when you go to the Dashboard it comes up saying something like, "please add some UI nodes to your flow and redeploy", the issue might be to first update everything and then make sure you have not added the node-red-contrib-ui from the palette as it is no longer supported (you might have done this if you, for example, had the switch node from the contrib-ui nodes as your option and used it). Once you remove this, everything should work fine.
Slight typo in instructions: when you see the example of sending the form data in Postman as:
{
 blue: 255,
 red: 0,
 green: 124
}
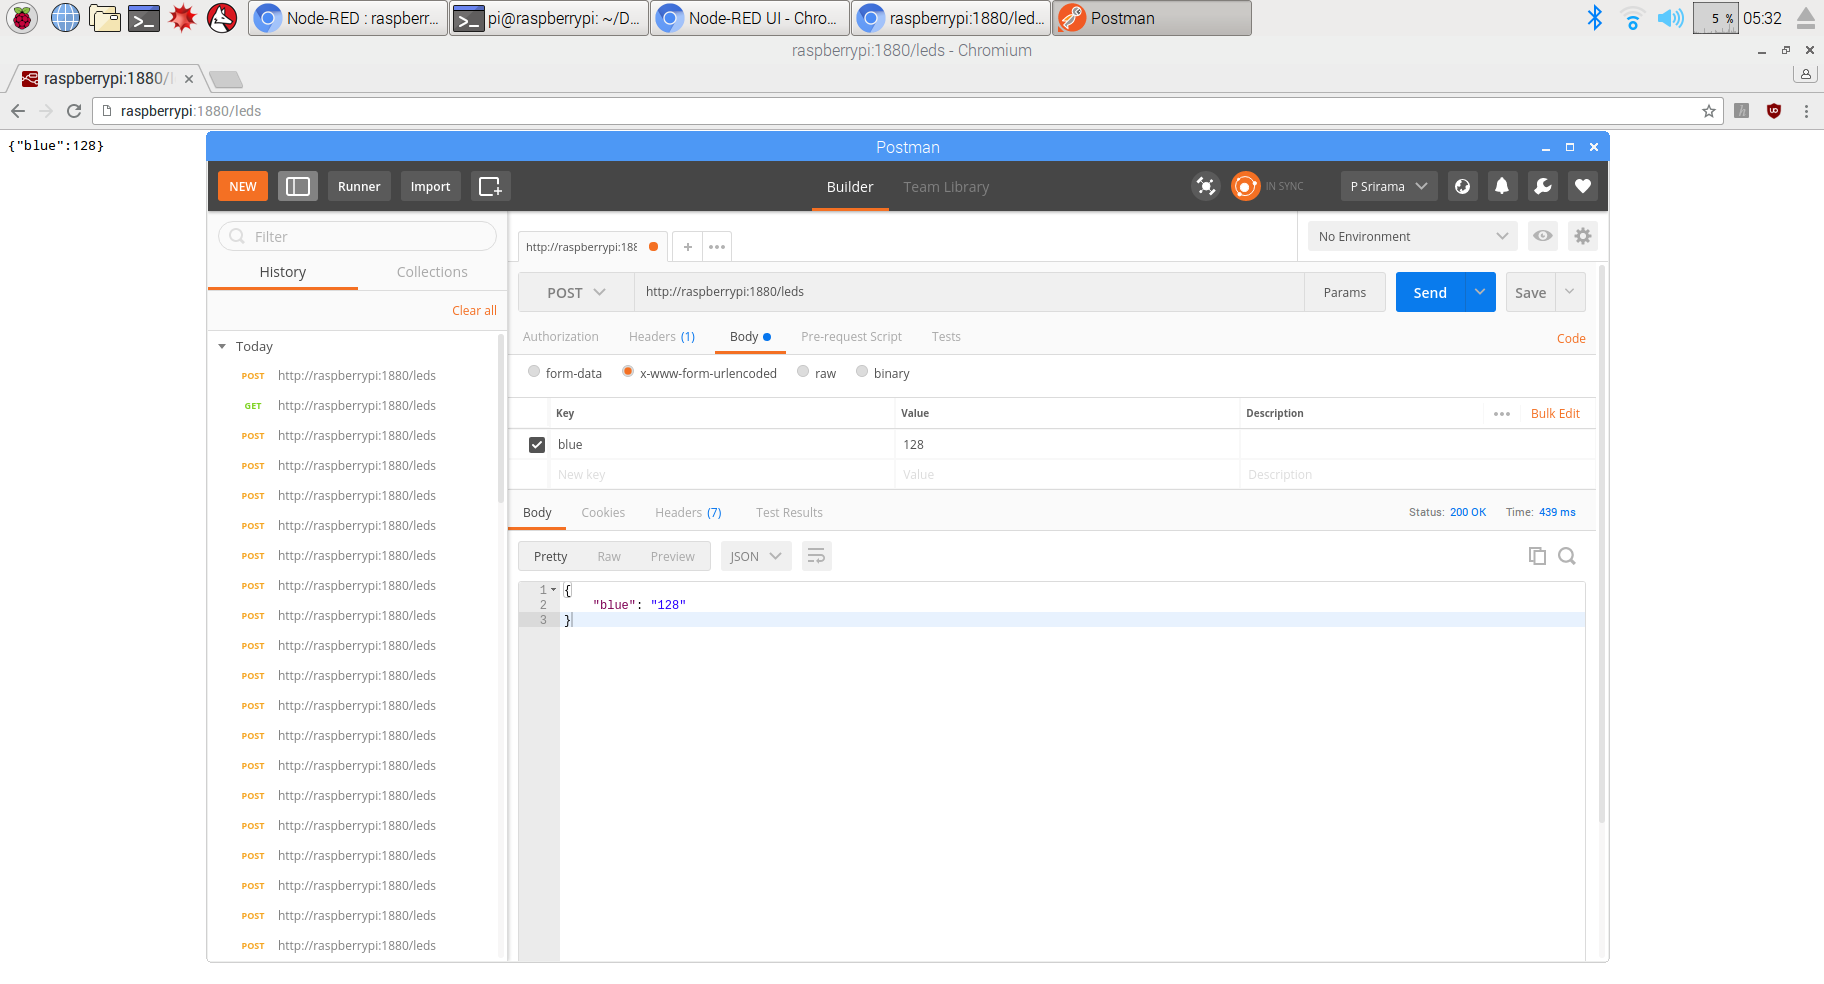
it should actually have quotes around the strings, as in the pictures later on, unless you've defined them as variables:
{
 "blue": "255",
 "red": "0",
 "green": "124"
}
Similarly, when you setup the Blue LED Function Node in Node-Red, you'd have to add the quotes as follows:
msg.payload = {"blue": msg.payload};
return msg;
This is because the led_fadeMQTT.py uses that payload in the on_message() function as:
payload = json.loads(msg.payload)
# the legal values for analogWrite are 0-255
grovepi.analogWrite(BLUE_LED, payload['blue'])
This is similar to the direct MQTT messages published via mosquitto_pub -d -t "SCHOOL/CLASS/leds" -m "{\"blue\":0}", etc.
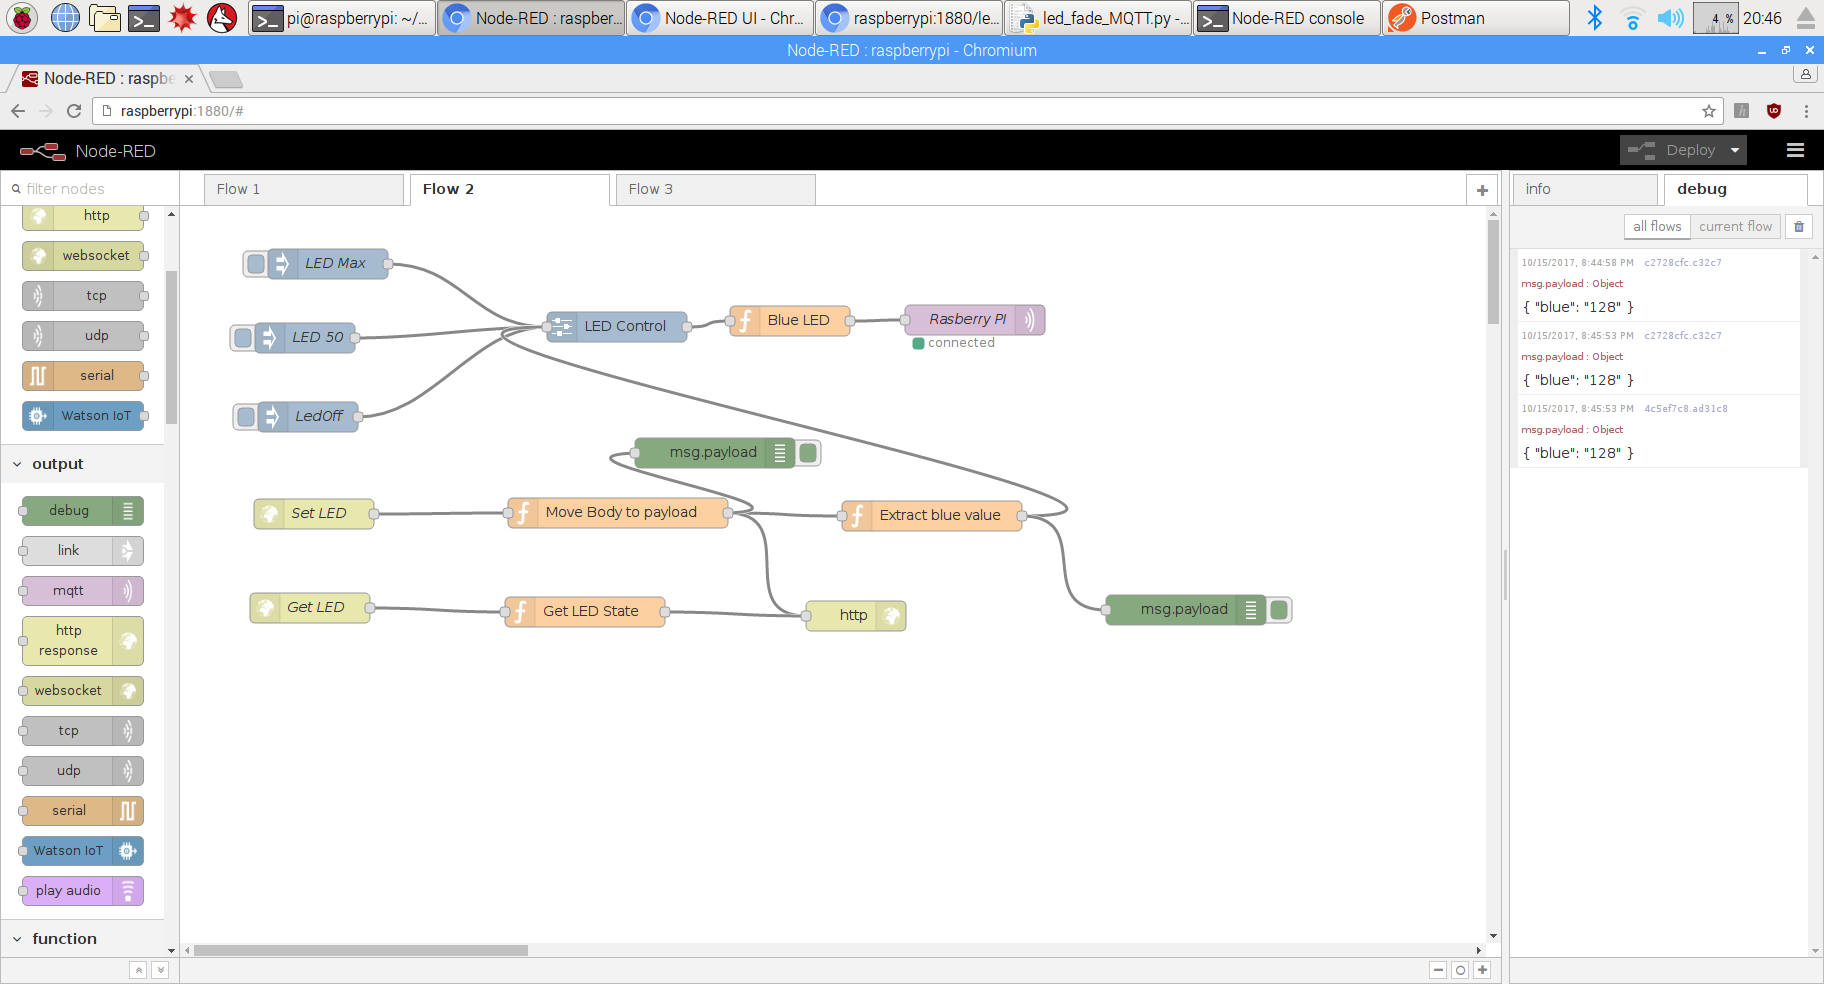
If node-red doesn't seem to allow any form of printing, you can try to troubleshoot it using print, this.warn, this.log, etc. If they all cause an error message, you can publish the contents of the debug object in the Debug panel. Also, please note that the msg.payload has two attributes like: "blue":"128". Since parseInt() is not able to convert "blue", it might return NaN (and become 0), as seen in the attached image:
This is thus similar to the JSON.parse() from Module 2 as you'll
need something like msg.payload = parseInt(msg.payload.blue);
You could also do something like this, e.g.:
var blueString = msg.payload.blue;
msg.payload = parseInt(blueString);
return msg;
You might have to use the javascript parseInt() function on msg.payload.blue (blue is an element within the payload object) in order to pass through the values using postman and setup the REST API. You should then be able to setup the UI and GET LED State in the webpage. Please refer to the attached diagrams representing the different values after changing the LED intensity (within blue).
Nota bene: please be sure to click the checkbox next to the Key in Postman before clicking Send, as seen above.
If for some reason you get 404 errors on
raspberrypi:1880/leds, please do check if you can access
raspberrypi:1880/ and, if not, try the IP address instead
as it might not be reaching it on the network via dns lookup alone. If
you can reach the / node (as opposed to the /leds), it's likely an
issue with how the nodes were setup so I'd recommend getting rid of
all the nodes and re-adding each one, step-by-step, and checking the
"Send" after each addition.
Nota Bene: The pace of progress is quite fast in this field so the newer versions often change certain UI features. The good news is that you're not constrained to Postman; there are a host of other API testing alternatives and please do feel free to research and use any that you like, including some that are listed here:
https://alternativeto.net/software/postman/
In general, please do remember that these hints are intended to be little tips and not explicit directions and you should research your own solutions.
I am sure most of you have now realized that by defualt there is no username and password setup to login to Node-Red. The following is how to setup basic username and password authentication into the Node-Red envirnoment. Adding SSL/TLS would provide encyption to better guard the login process and session data.


Start by running the following command in order to install the needed package: sudo npm install -g node-red-admin

Nota Bene: If you get an error, please check to see if npm (Node.JS Package Manager) is already installed and just needs to be updated.
node-red-admin hash-pw

With the password hash created, make sure that you copy and paste the password hash output on the screen to a temporary text file. This hash will be used next.


Where the text says "admin", replace this with your new username. In my case I used my first initial, middle initial and lastname. Make sure to leave the quotes around the username, as Node-Red is looking for a text string.
Same for where the text has "$2a$08......" the default hash value, take the hash of the password that you created and saved to a text file in step 5 and paste it in place of the default one. Again remember to leave the quotes.


1) Turn off your node red service
2) Copy the settings.js.bak file to the settings.js file to overwrite any previous changes. The command is: cp settings.js.bak settings.js
3) Turn the node red service back on
Here is the link to the video that I found on how to set this up. Best of luck. https://www.youtube.com/watch?v=_cpqvUoR044
Some helpful video references for this week are:
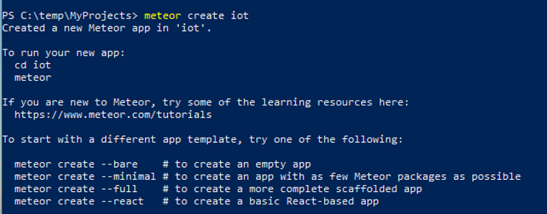
Meteor, or MeteorJS, is a free, open-source framework for building web and mobile apps in pure JavaScript. The general expectation is that you'll install Meteor on a different PC. The assumption is that most people have Windows PCs so using a package manager like Chocolatey is one of the easiest routes for installing Meteor. If needed, you could set it up as a VM or install on a non-Windows machine or even on the Pi but that would introduce more complexities. As such, the easiest route is to install it on a Windows PC using Chocolatey.
You'd use something like choco install meteor to do so
but Chocolatey might be deprecated and you can use something like
npm install -g meteor (you might have to ensure your Node
version matches the version required by Meteor by checking its install
page (e.g., if you receive an error about not being able to install in
a global context since meteor shouldn't be added to your package.json,
downgrading your Node version might fix it).
The best place to start is via https://www.meteor.com/install but if you wanted to install it on Windows, you can do so using either a elevated command prompt (one with Administrator privileges) or using Power Shell, as shown here: https://www.youtube.com/watch?v=OEIyk80XuDU
The default installation of Meteor also installs MongoDB in the meteor package in a directory named .meteor. While meteor is running, you can access meteor at http://localhost:3000 and the MongoDB database called meteor at mongodb://localhost:3001/meteor.
Also, if you're trying to follow the app, perhaps their github site where they commit each step of the tutorial separately might be helpful:
https://github.com/meteor/simple-todos
This github repo is based on the blaze tutorial (as they describe in the repo) linked in the Module: https://www.meteor.com/tutorials/blaze/creating-an-app
You might want to create the simple-todos app by passing the full parameter as that will create the imports directory along with the rest of the project for you. This might make the process a little smoother:
meteor create simple-todos --full
Here is a nice 48-minute tutorial that features a step-by-step process for creating a Meteor App: https://www.youtube.com/watch?v=9494-2E4riQ It actually builds a note-manager app as opposed to a to do list but the underlying ideas are the same and the video routinely references the Blaze Todo App Tutorial as well. Students have liked this tutorial in the past as it provides much more thorough explanations throughout the process.
You might have additional issues like:
diff on githubYou can see differences for any step by doing the following:
# import the remote references
git fetch https://github.com/meteor/simple-todos.git refs/heads/*:refs/remotes/other/*
# get the commit hash for your step (replace 10.3 with your step number)
git log --no-merges remotes/other/master --grep="Step 10.3" --format="%H"
# view any differences- replace the commit hash with the value from the previous command,
# and add a file to the end to only see the differences for that file.
# git diff ..
# this command will show you any differences between your tasks.js and the "Step 10.3" version of theirs,
# but you should replace the commit with whatever step you are on
git diff ..96a1a2893e1092ba0d36bf344e39ea00f7b90396 imports/api/tasks.js
on linux or unix, you should be able to combine the last two steps and just run:
git diff ..$(git log --no-merges remotes/other/master --grep="Step 10.3" --format="%H") imports/api/tasks.js
replacing the step number with your target
The main link for the Simple-ToDo app tutorial with React (instead of Blaze) is here https://www.meteor.com/tutorials/react/creating-an-app
There is a very nice playlist of videos that takes you through the entire process of doing the default meteor Simple-ToDo tutorial in a series of videos here: https://www.youtube.com/watch?v=UsBN3RDy3Qw&list=PLhScwEnhQ-bmkhurUJJj16TMUKF0zLmxC
There is also a simpler tutorial for an older ToDo app in Meteor here: https://www.tutorialspoint.com/meteor/meteor_todo_app.htm as well as this tutorial for the ToDo app from a book extract: http://meteortips.com/second-meteor-tutorial/getting-started/
You might run into issues as the tutorial tends to get outdated quickly. Here are some links if things aren't working quite as well as the original tutorial: https://forums.meteor.com/t/basic-to-do-app-not-working/20796 and https://github.com/meteor/tutorials/issues/30 and https://forums.meteor.com/t/simple-todos-tutorial-gives-no-tasks-from-mongodb/22089/6
The Simple-ToDo app tutorial is just a sample app using MeteorJS. If you find the Simple-ToDo app, and its associated tutorial, daunting or particularly troublesome, please do feel free to research your own tutorial on the web to built any Meteor app at all as our goal is to get familiar with Meteor apps and how to build and adapt them so we can build an IoT app based in Meteor in the next module.
With that in mind, you might want to reference this video tutorial on creating a similar (but different) app using Meteor: https://www.youtube.com/watch?v=9494-2E4riQ
And here's an updated version of that tutorial:
https://www.youtube.com/watch?v=2QQGWYe7IDU
The link in the module (https://youtu.be/LoHxiZUtg7s) is broken; here are some amended/substitute links; please do give them a try instead:
I've also been enjoying this one as it is closer in technology to what is shown in the meteor starter instructions.
https://www.leveluptutorials.com/tutorials/meteor-react-for-everyone/series-introduction
It incorporates React with Meteor as opposed to Blaze as that's what the latest Todo app uses.
Finally, here are some additional videos that might be especially helpful:
If you are working on the Meteor tutorial on Windows 10, you might run into some issues when you try to run it including the following error on the command prompt when trying to create the project.
Error: Error: Could not install npm dependencies for test-packages: Command failed:I'd recommend running everything in an elevated command prompt with Administrator privileges but, if that doesn't work, you might have to install Git. It turns out that Git is a requirement that Meteor doesn't download and install for you. There is a lot of information in the error that points to this being the issue and it is also delineated on this forum post:
https://github.com/meteor/meteor/issues/8585
You can download and install Git from here:
After downloading it, please reboot the computer and ensure you run the command prompt with elevated privileges to install Git and retry the Meteor installation.
Also, when you install Meteor for Windows, the version here might work better:
https://install.meteor.com/windows
You might also have to uninstall Meteor using Chocolatey, clean any lingering data from your system, and install using an older Windows installer. This was all suggested in a forum post from symptoms you might see after manually installing all of the missing npm packages. E.g., an error you might see the following error on variety calls in the cmd prompt:
EPERM: operation not permitted
If you do, please do check this post/instructions to get a working install.
https://github.com/meteor/meteor/issues/8139
Nota Bene: please install Chocolatey using the command prompt as an administrator before you install Meteor.
Nota Bene: the best order might be to install Chocolatey and GIT first and then Meteor.
You might run into alternative issues with the installation. If you do, another thing you can try is to delete all of your meteor and chocolatey files (by finding folders and deleting them manually) and start over. The missing GIT installation will no doubt be a persistent issue so you can install that by using these instructions:
https://www.develves.net/blogs/asd/articles/using-git-with-powershell-on-windows-10/#installing-git
Once this is done, you might still get an error about a missing "babel runtime npm package" and it will probably lead to the error, "exited with code 1" Your application is crashing... but with the babel runtime missing. If you follow this error, it will likely want you to do a:
meteor npm install --save babel-runtime
meteor npm install -save @babel-runtime
But you might have to do this twice in order for it to work.
You might run into issues while testing your Meteor application where the application itself seems to be running as expected with all the features working properly but the testing step at the end is producing errors in the command prompt and no output in the browser window. The error might look like the following:
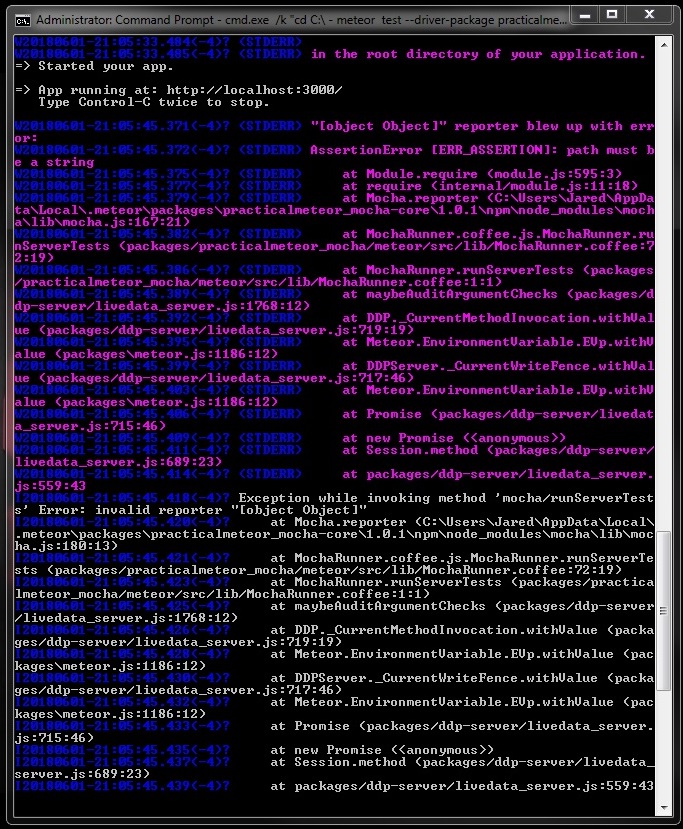
It's a pretty lengthy list of errors that seems to be related to invoking the method 'mocha/runServerTests'. The errors include:
"[object Object]" reporter blew up with error:
AssertionError [ERR_ASSERTION]: path must be a string
invalid reporter "[object Object]"
After you check for something wrong with the code, the version of meteor and mocha, or using a different testing method, you can reset the project and run the tests as an admin but if nothing still seems to work, it might have to do with with having duplicate code in one of your folders.
No matter what, though, you should install a different test package due to the upgraded version of meteor to get it to work correctly. E.g., you can uninstall the practicalmeteor package and install "meteor add cultofcoders:mocha" and then run it as " meteor test --driver-package=cultofcoders:mocha". This should hopefully solve the issues and the testing should work. Here are two links regarding this.
https://github.com/practicalmeteor/meteor-mocha/issues/100
https://blog.meteor.com/announcing-meteor-1-6-1-50aad71da4e6
I think removing practicalmeteor might be the key. I've also periodically run into EPERM: operation not permitted errors when attempting tests. I had originally gotten around this by running the command prompt as an admin but running them as an admin might be dangerous so I found that running "reset meteor" fixed the issue, although it deleted all of my tasks.
An alternative option to the cultofcoders.mocha is to upload meteortesting.mocha also. The cultofcoders.mocha states that it is the practical meteor made to work with meteor 1.6.0 and newer coffee versions. Please see here for the meteortesting.mocha links:
https://forums.meteor.com/t/meteor-1-6-1-practical-mocha-invalid-reporter-object-object/41911
The javascript debugger is very helpful in figuring out what JS applications are doing and since Meteor is new to all of us, I thought it might be helpful to review the JS Debugger for the ToDo app, especially since we don't have any references for it in Meteor's ToDo-App Tutorial. The debugger can help us see what's going on under the hood and how to troubleshoot when an issue comes up. It can be time-consuming and quite frustrating to directly pore through the framework code to try to figure out any issues that arise and the JS Debugger can help with that quite a lot.
You might have to research how to do this in other browsers, but for chrome it is pretty straight-forward. Open up chrome's dev-tools by right-clicking and selecting "inspect" or you can go straight to the javascript console using the command keys from the answer here: https://stackoverflow.com/questions/66420/how-do-you-launch-the-javascript-debugger-in-google-chrome.

Explore the tabs at the top of the inspector window if you haven't before, there are a lot of useful tools there. I use the console tab for trying out Javascript. With the inspector tools open, add a debugger; line wherever you want in your client-side code.

When you refresh your app (Meteor should for you) you will be dropped into the debugger. There is a bunch of useful information about your local scope in the sources tab.

If you go into the console tab from there, you can execute/try out different lines of javascript and see the results without changing your app code. The autocomplete is really helpful for seeing which methods are available to you.


From there you can try different methods to get what you want from that point in the code's execution. Once you've figured it out, you can add what you learned back into your real code and remove the debugger line. Even with Meteor's auto-refresh, this saves me a lot of time and I'd highly recommend it. Note that you might find some interesting things, like your debugger point getting hit more than once. Some methods might be called more than once during page load, and the scope might change a little between calls. Usually, the first time I add a debugger I click the resume button in the "Paused in debugger" window at the top and see if the page loads entirely before hitting the debugger again, just to get an idea of how often that method is called and what to look out for.
MongoDB in 30 minutes: https://www.youtube.com/watch?v=pWbMrx5rVBE
We're aiming to do something like this:
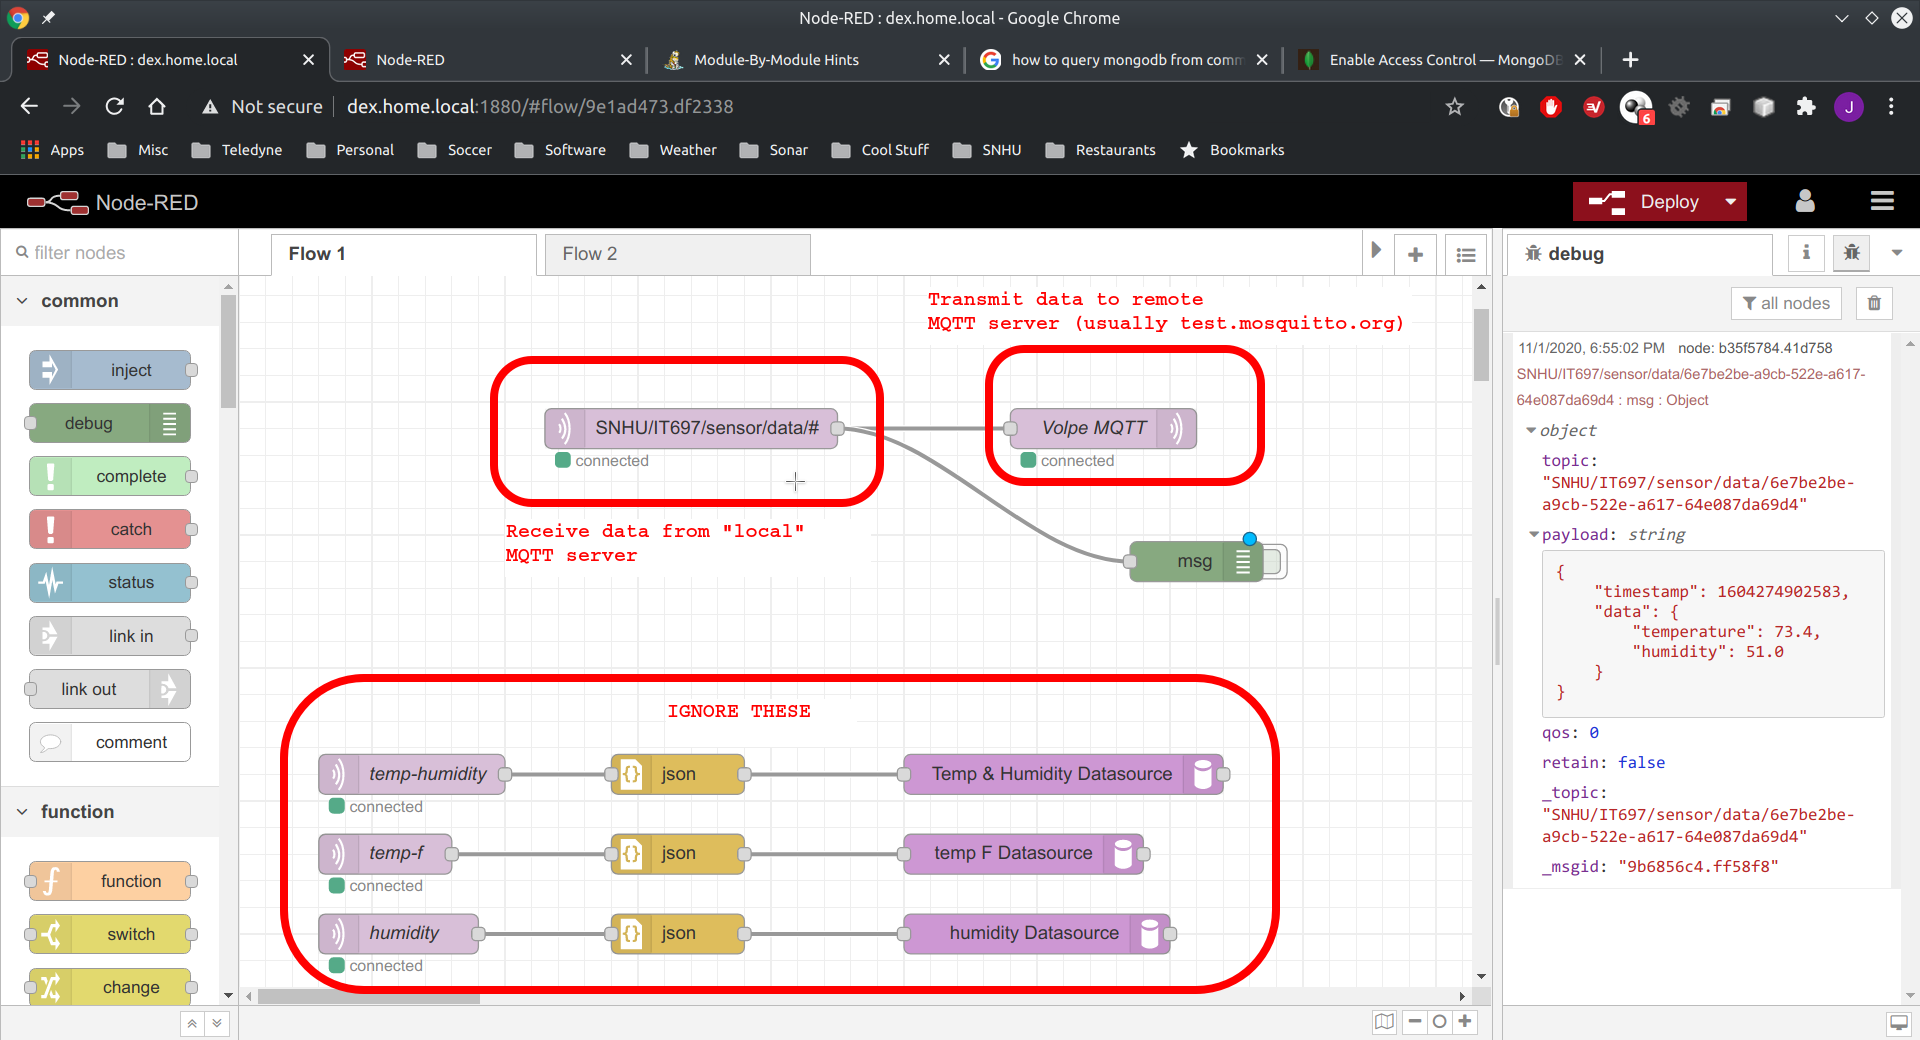
So you'll need the above relay flow in node-red; that flow is supposed to take data from the local MQTT server and send it verbatim to the remote MQTT server. So the python code publishes sensor data to the MQTT server running on the RaspberryPi and this flow (also running in the RPi) relays that data to the MQTT server running remotely.
Some questions to ask if things don't seem to be working are:
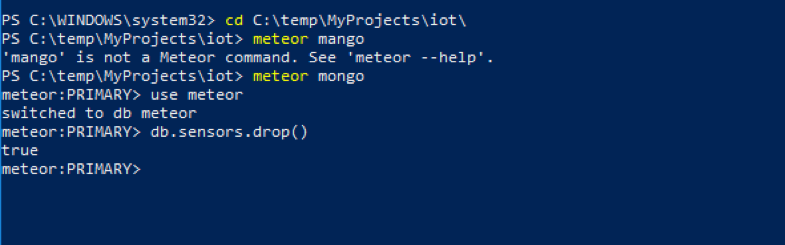
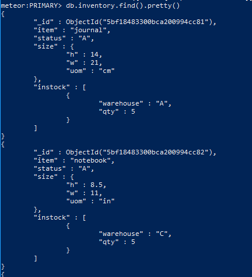
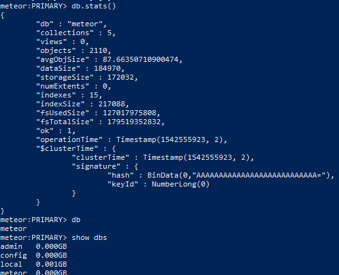
db.tasks.insert(), e.g.?Add Tasks Collection and Date node to see if it's sending the correct payload)You can check to see if the tasks are in the mongo db by seeing what db.tasks.find() shows (you can use this after doing meteor mongo to see what's in a specific Collection). Does that show anything? We can also add tasks directly (using db.tasks.insert()) to see if there's an issue with the db or not.
You can also use external programs like the MongoDB Compass GUI to connect to the MongoDB server to see if your strings are being saved in there when you add items using something like Tasks.insert({text: "Add new todo", createdAt: new Date()}) in the JS console in Chrome or in the meteor shell. You do need to ensure the JS has a return statement: https://stackoverflow.com/questions/31353976/meteor-changes-in-collections-are-not-reflected-in-rendered-html
If you have issues concatenating the uuid, please save it to a variable first instead of using the function directly in the concatenation. I.e., you might want to try something like this:
uuid = uuidgen.generateUuid()
topic = "SCHOOL/CLASS/sensor/data/"+uuid
instead of
topic = "SCHOOL/CLASS/sensor/data/"+uuidgen.generateUuid()
If you see an error like "can't concat bytes to str", it's likely due to your using Python 3, where strings are encoded differently from Python 2. As such, concatenation of strings and UTF-8 output from the netifaces package can cause errors and you might have to remove the encoding of the netifaces output.
Finally, to follow up on the issues mentioned in the announcement post during week six about being unable to connect. To troubleshoot, I ran an older project that connected to 'test.mosquitto.org' and it connected with no issue. After some playing around, I found the fix if anyone is still experiencing issues. In your mqtt input node, ensure you enter your topic , i.e. 'SCHOOL/CLASS/sensor/data/#'. Most importantly, check the mqtt output node. The server should be set to test.mosquitto.org (I set the port to 1883), and the topic field should be left empty. If you enter your topic here as well, it will cause connection issues.
This can look like:
local_client.publish('SCHOOL/CLASS/sensor/data/' + uuid, json.dumps(publish_data))
In addition to saving the UUID as part of the topic as indicated by the instructions, you can also add the new UUID variable we created above to the JSON string that contains your sensor data, something like:
publish_data = {
"temperature": temp,
"humidity": hum,
"uuid": uuid
}
This way, the UUID is published as part of the object containing the sensor data and can be extracted with a function in Node Red.
DEBUGGING: This is also the way to pinpoint the UUID issue: connect a debugging node to the incoming MQTT node will show the UUID in the topic, which could indicate whether the outgoing MQTT node was removing it when forwarding the message to the data broker.
Some helpful links/tutorials:
The system we're building is as follows:

At the beginning of Lab 7, it might help if you have to create a new meteor project with both default settings and using the '--minimal' flag, add the required packages, remove insecure and autopublish. Next, you have to delete all of the boilerplate files leaving only the .meteor folder and the package.json file.
You have to edit the package.json file (more about package.json) to remove the following code, including the comma:
,
"meteor": {
"mainModule": {
"client": "client/main.js",
"server": "server/main.js"
},
"testModule": "test/main.js"
}
This should leave something like the following:
{
"name": "iot",
"private": true,
"scripts": {
"start": "meteor run",
"test": "meteor test --once --driver-package meteortesting:mocha",
"test-app": "TEST_WATCH=1 meteor test --full-app --driver-package meteortesting:mocha",
"visualize": "meteor --production --extra-packages bundle-visualizer"
},
"dependencies": {
"@babel/runtime": "^7.0.0-beta.51",
"meteor-node-stubs": "^0.4.1"
}
}
You might also have to remove your test directory and rebuild. This might also involve deleting the node_modules and reintalling them using the meteor npm install command. Here are some newer directions that might help:
You can then go on to create all files according to the PDF directions.
Optional: this might help to call the correct file name in the package.json file. You still might have to rebuild the node_module folder with the error of "meteor npm install --save @babel/runtime." Once that is done and the package is calling router.js instead of main.js, it should run (but this whole step might not be needed for you).
You should eventually see something like:

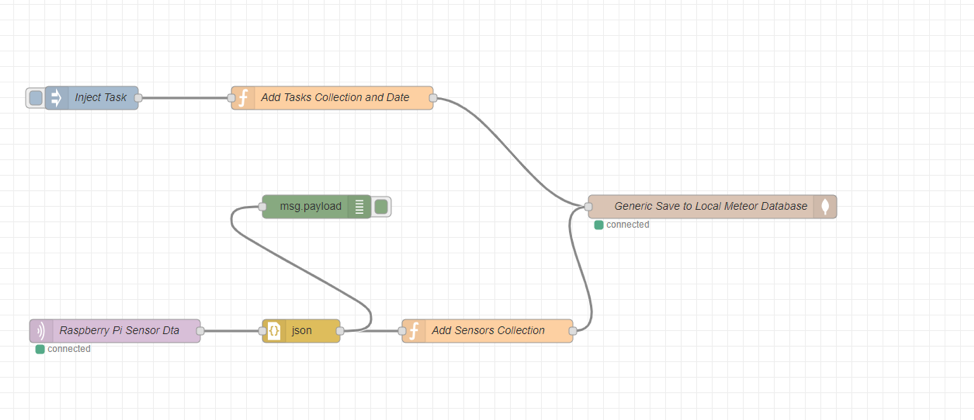
Here's a screenshot of what you might get from the Node-Red JSON node in debug. This is before the function node that either adds everything to the collection or overwrites the data in place.

Here is a potential node setup, as well. This doesn't have both function nodes connected so you could verify the separate behaviors.

Please note that this is an Object from the MQTT input and not a string. The "Add Senssors Collection" node might have something like:
msg.collection = 'sensors';
// Get UUID from sensor to use as the _id field in the database
msg.topicParts = msg.topic.split('/');
msg._id = msg.topicParts[msg.topicParts.length-1];
return msg;
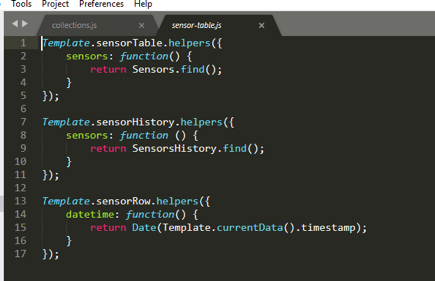
If your display doesn't show the temperature/humidity, please ensure your variable names match from MQTT to Meteor. E.g., this might require you to change the names in the MQTT data to match the names in the Meteor client/sensor-table.js, sensorRow template (like temp => temperature, etc.).
Also, if you get get "duplicate_id" errors on the database output, you'll need to check your database output node on node-red; if you use "insert" as the database operation, you'll need to change it to "save" to allow a single record to be stored for each sensor (by UUID), otherwise you'll get the above errors.
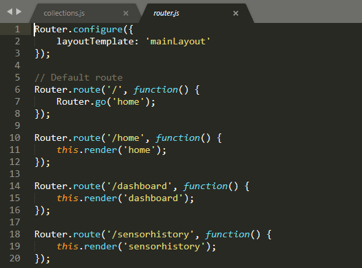
If, instead of seeing something like the above, you get an error like "Uncaught ReferenceError: Router is not defined", it's likely an issue with your installation of iron:router (meteor is notoriously tenuous and might require multiple updates/resets/checked installs). In this case, you can try to do a quick meteor add iron:router but, if that doesn't work, you can then try meteor remove iron-router and after that do meteor add iron:router, which should hopefully fix the issue. If needed, you can also try a meteor reset and then meteor to check.
You might also have to do the Babel Runtime install, either via
meteor add ecmascript or npm install --save @babel/runtime
or some such.
In addition, depending
upon your system configuration, you might need to do
the iron:router install with the --allow-incompatible-update option.
And, as always, you might need to restart the apps (multiple times) in
order for your changes to take effect.
If you try both the react and the blaze tutorials, you might get things mixed up in your installations. If you want to go back from react to blaze, you can do the following to try to get your form working according to the blaze instructions only; e.g., I:
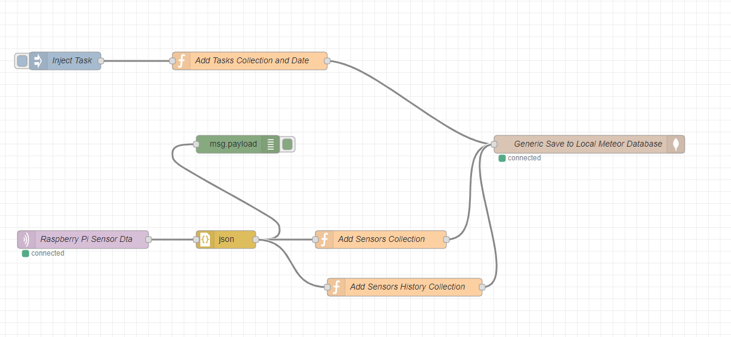
meteor remove kadira:flow-router kadira:blaze-layout static-html react-meteor-datameteor npm remove react react-dommeteor add blaze-html-templates reactive-dict - you'll see these added to your .meteor/packagesmeteor remove autopublish per the instructions from the tutorialreact_tutorial_codemeteor reset and then meteor was working fineAt the end, you need to add a new collection like sensorhistory in addition to the sensor collection. As such, you need to add another collection called sensorhistory and also edit your nodered flow. You can add a second function to add the timestamp collection in the collections.js file within the IoT app to include a new collection as well as define a new side nav for a separate dashboard in the single MongoDB.
So you'll have to add a second collection with a second tab for sensor history. Your node-red functions might be something like:
add sensor data attributes:
msg.collection = "sensors";
msg.topicParts = msg.topic.split('/');
msg._id = msg.topicParts[msg.topicParts.length-1];
return msg;
add sensorHistory:
msg.collection = "sensorHistory";
return msg;
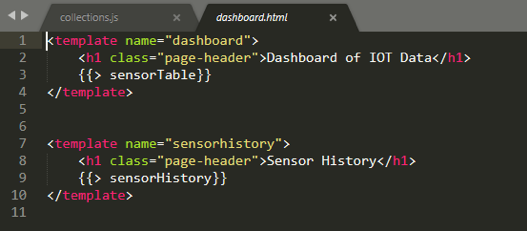
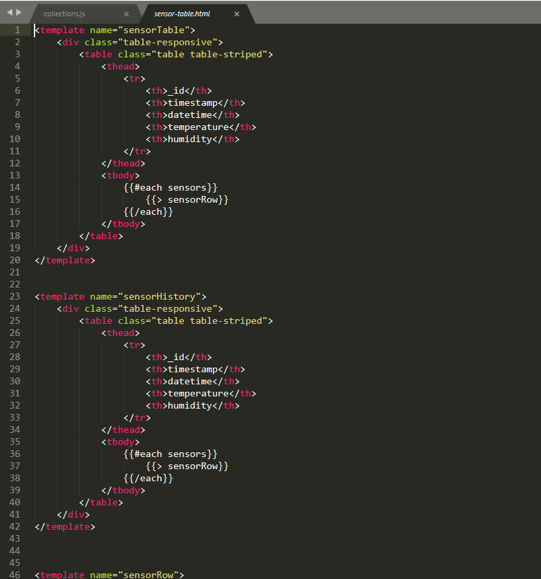
Both nodes are taking data from Json function and then pushing to the mongodb output node.You have to create/update files in the iot application. You also have to ensure your application is not just subscribed to the sensors collection otherwise you will get the same output in both tabs despite publishing data to the sensorHistory collection. You should declare a template, dashboard, and helpers for the second collection. This is basically a matter of replicating the dashboard.html file and the sensor-table.js file and replacing sensorTable with sensorHistory. You can update the sensor-table.html file with the same process, duplicating the sensorTable template and replacing with sensorHistory. Here's a sample of the code:
*new dashboard:
If you get an "Authentication failed" error when you try to send data from Node-RED to MongoDB but can access and insert documents into MongoDB (e.g., in the meteor db or collection tasks via the mongo shell), it might be a username issue. This is especially true if you installed the Robo 3T GUI with MongoDB. One fix might be to reinstall Node.JS, uninstall Robo 3T, and then create a new username and password directly to Mongo through the command line. If Node-RED is crashing, as well, after a few posts to the db, one fix might be to disconnect the database and confirm you can open Node-RED safely, then delete all your flows and create entirely new flows.
JSON at position 0This kind of error is usually the result of trying to do a JSON.parse(undefined). It could also be because the temperature sensor is sending an empty value. Either way, the result is that msg.payload is undefined .
In general, the best way to debug in NodeRed is to put in a catch code that's wired to a debug node for every tab.
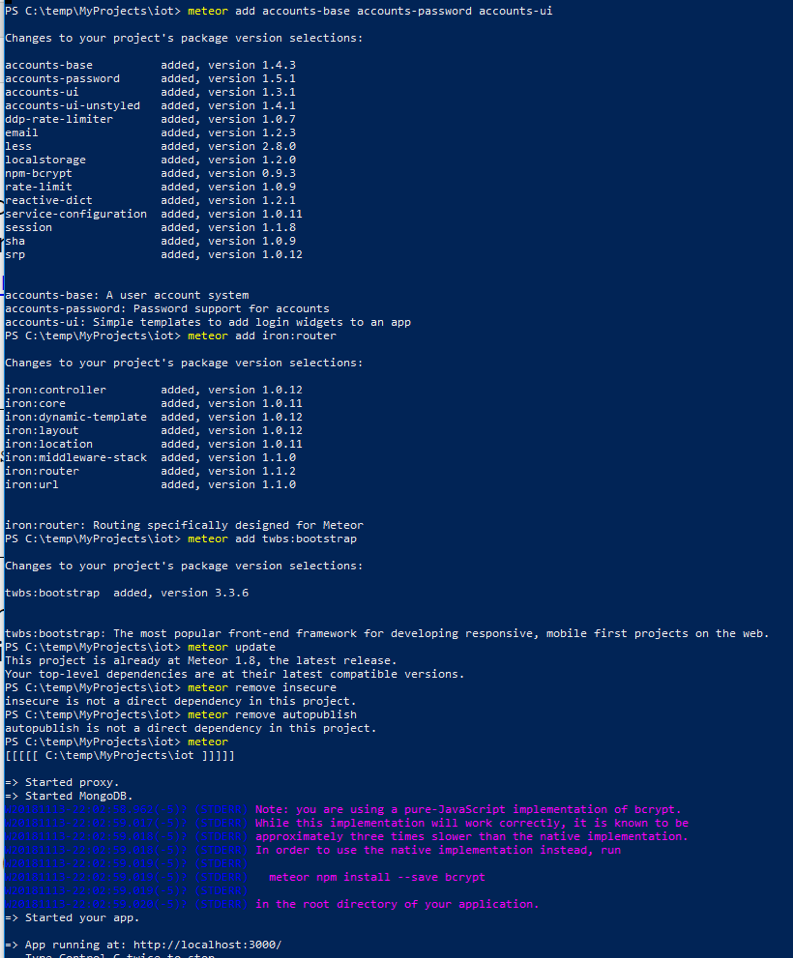
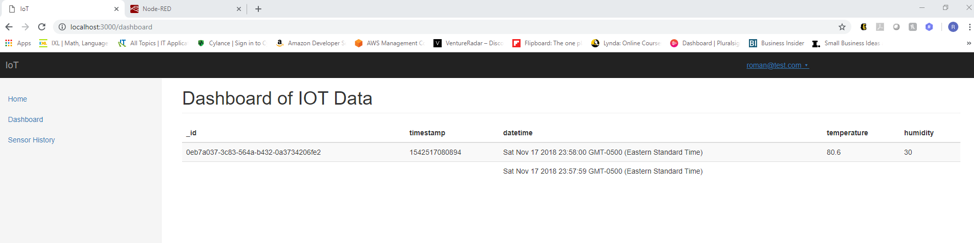
The goal of the lab itself is to create a new visual dashboard app which displays and stores real time as well as shows historical data. To accomplish this, you will first create a new Meteor project called iot and load it with a set of packages which includes packages such as bootstrap and router and basic login.
Here is a list of files:
client/dashboard.css – css dashboard styling
client/head.html – Head and meta tags supporting responsive deigned.
client/router.js – Client and server URL routing.
client/main-layout.html – Default structure routes templates
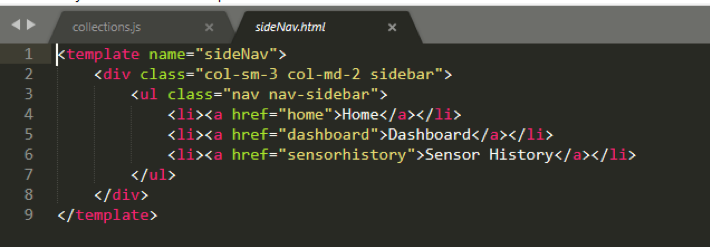
client/topNav.html & client/sideNav.html - Hidden templates which content appear after login
client/home.html -Home template
client/dashboard.html – Sensor dashboard template
client/sensor-table.html - Template to display sensor data
client/sensor-table.js – javascript helpers
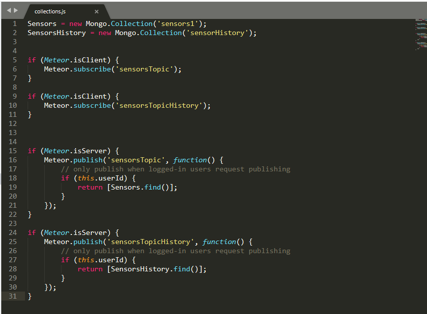
collections/collections.js – Sensor data collection, data subscription and data publishing.
At this point, you have to create a login and uncover the sideNav
component:

You will then create a new Node-RED which will subscribe to the
test.mosquitto.org topic from module six. You will add a JSON node to
convert the JSON string to a JSON object:
After you deploy it and start to collect data from the sensors on the app, you can modify the "Add Sensors Collection" function:
msg.collection = "sensors";
msg.topicParts = msg.topic.split('/');
msg._id = msg.topicParts[msg.topicParts.length - 1];
return msg;
Next, you can clear the mongo db on mongodb:
To put it all together, you can add another function to display the
continues growth results at top of the in-place section:

You can review some of the MongoDB commands here: https://www.youtube.com/watch?v=pWbMrx5rVBE
Finally, you'll need to edit the package.json file to ignore these modules and run meteor npm install --save @babel/runtime so the package is calling router.js instead of main.js.
New package.jason code:
{
"name": "iot",
"private": true,
"scripts": {
"start": "meteor run",
"test": "meteor test --once --driver-package meteortesting:mocha",
"test-app": "TEST_WATCH=1 meteor test --full-app --driver-package meteortesting:mocha",
"visualize": "meteor --production --extra-packages bundle-visualizer"
},
"dependencies": {
"@babel/runtime": "^7.0.0-beta.51",
"meteor-node-stubs": "^0.4.1"
}
}
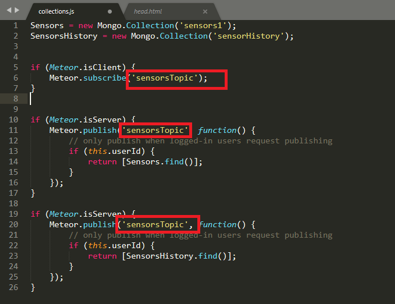
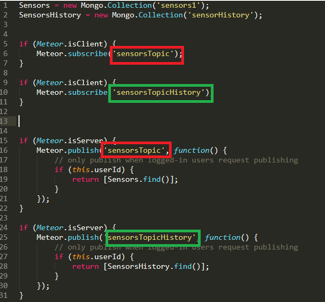
If you have a collection misconfiguration, where you use the same subscription topic arguments for both collections, this can result in the app not reading the data from your sensorHistory DB. You can fix this by fixing the collection arguments as found on https://docs.meteor.com/api/pubsub.html#Meteor-subscribe:
If you find the test.mosquitto.org MQTT message broker is unreachable/sending connection refused, the most likely cause is
due to a hosting issue at test.mosquitto.org.
If you experience the above issue, you can use an alternate remote MQTT message broker.
Here is a list of Public MQTT Brokers: https://github.com/mqtt/mqtt.github.io/wiki/public_brokers
Let's start by getting rid of the old IOT folder and creating a new one.
If you want to do it without the IOT.ZIP file, you can do so as follows; this should help with the new version of meteor (as a side note, you can still use the old version and it should work as in the project notes still!). But here are the rough steps:
I think the main problem is the folder structure and some mismatch between what the current version of the Meteor framework is expecting vs where the Module 7 guide places files in the older version. Most of the problems seem to be solved by consolidating all the various html/js/css files from different folders into a single file for each type (so, three files are all that's needed, a FOO.html, FOO.js, and FOO.css) but another approach might work better for you, as well!
Please do try this instead:
If you get an error about UnicodeDecodeError when you run your python script, it might be an issue with the uuidgen.py file. You might be able to resolve it by replacing the uuidgen.py file with the same one we used for the Meteor application. Please do also ensure the four files for this project are in their own directory, then erase the new uuidgen.py file, then just copy and paste the older one into the directory.
The issue is likely related to the following line:
mac = netifaces.ifaddresses('eth0')[netifaces.AF_LINK][0]['addr']
It seems to need the encode() method from module six at the end of it:
mac = netifaces.ifaddresses('eth0')[netifaces.AF_LINK][0]['addr'].encode ('utf-8')
If you use the provided code with the above change, it should work. However, completely replacing the file could end up causing some minor issues with your Node-Red flow.
As a final note, if you're using Python3 and get an error, you might need to update netifaces using something like "sudo apt install python3-netifaces" and also remove the encoding from the uuidgen.py.
FEEDBACK:
Experiential Learning Experience from a former student
Dr. Sethi et al;
This has been one of the best experiences I have had since joining SNHU as a graduate student. This class is definitely geared towards a masters program and exudes all of the qualities one expects to see at this level of learning.
What I found as Quality Traits:
I found myself at times technically challenged and strived to meet that challenge. I am walking away from this course with a new understanding of IoT development. It opened my understanding to this area in my profession and definitely something I will continue to pursue in my own time.
There are so many positives about this course, all I can say is Bravo we need more like it!
Areas for improvement:
Student Readiness
Dr. Sethi, Thank you for a very enjoyable course, it was superbly executed!
- cheers to all