Step 1: If you run into any problems at all, please start by searching for that issue on Google! You might be amazed at how almost all of the problems you come across were already asked and resolved on the web.
And, failing that, please post in our class forums. When you do post, please do feel free to include screenshots from the raspberry pi to help give details of the issue. Almost all of these hints are garnered from a combination of online forums, class forums, and voodoo programming. :)
This course will utilize a combination of hardware components as the basis for an Internet of Things (IoT) device and to create an IoT application. The cost of required materials that will be needed by most is approximately $160.
You'll likely need the following to get going:
Raspberry Pi (RPi) is a complete computer-on-a board, providing the foundation platform for your IoT experience. This Raspberry Pi starter kit usually includes the needed base components and NOOBs software installer: https://www.amazon.com/Vilros-Raspberry-Complete-Starter-Clear/dp/B01CUMNIV8
Should the above kit be out of stock, the following are some acceptable alternatives: https://www.amazon.com/DIGISHUO-Complete-Starter-Raspberry-Heatsink/dp/B08G8QYFCD/ or https://www.amazon.com/RasTech-Raspberry-Starter-Heatsinks-Screwdriver/dp/B0B6NMQFVR/ or https://www.newegg.com/p/3C6-00A2-00001
Picking a raspberry pi starter kit: whether you get the Vilros kit or the CanaKit they include the same stuff just with different names (but the Vilros kit SD card has retropie on it which the CanaKit does not but most of the programs are open source so they are free). You can always use Etcher to install the appropriate image, as well, as long as the hardware is functional.
Turning your Raspberry Pi into an IoT device requires you to interface it with the outside world, and for this experience we will be using sensing and control components from this GrovePi+ Starter Kit, like this: http://www.amazon.com/Dexter-Industries-GrovePi-_Starter-Starter/dp/B00TXTZ5SQ
Should the above kit be out of stock, the following is another alternative: http://www.amazon.com/Seeedstudio-GrovePi-Starter-Kit-Raspberry-certified/dp/B01BRCEWV2
Out of Stock Alternatives
For the GrovePi sensors, you can get either the GrovePi+ Starter Kit or Seeedstudio-GrovePi+ Starter Kit , as well.
You can also get them directly from the manufacturers, of course: GrovePi+ Starter Kit or Seeedstudio-GrovePi+ Starter Kit . Finally, you can just get the base kit without the Pi (which you can buy separately from Amazon as per the above raspi starter kit links) directly from Dexter Industries: https://www.dexterindustries.com/store/#grovepikits
You might also be able to get it from other sites like Newegg but the delivery times might be longer there: https://www.newegg.com/Seeed-Studio-Embedded-Solutions/BrandSubCat/ID-90080-446
Or also EIO: https://www.eio.com/products/seeed-studio-110060161-grovepi-starter-kit-for-raspberry-pi
As one last alternative, please do feel free to also check for them on eBay, as well.
The main components we need are the LCD, the Temperature/Humidity sensor, and (optionally) the Rotary Angle sensor.
Designing the Internet of Things
Adrian McEwen & Hakim Cassimally
Publisher: Wiley; 1st edition (December 9, 2013)
ISBN-10: 111843062X
ISBN-13: 978-1118430620
http://www.wiley.com/WileyCDA/WileyTitle/productCd-111843062X.html
The Raspberry Pi (RPi) runs an operating system called Raspberry Pi OS (previously, it was called Raspbian), which is a Debian-derivative designed especially for the Raspberry Pi. The version of Raspberry Pi OS it installs will likely come with the Raspberry Pi Desktop (RPD) GUI and be based on the latest version of Debian at the time. The current version of the OS is called Bullseye and previous versions were called Jessie, Stretch, and Buster (see here).
Your RPi likely comes with the default Raspbian installer on the SD card called NOOBS ("New Out Of the Box Software"). This was the old way of installing the OS; NOOBS for installing Raspbian is available directly from raspberry here: https://www.raspberrypi.org/downloads/noobs/. You can also find out more about using NOOBS here: https://www.raspberrypi.org/magpi/beginners-guide-noobs/
The new way is by using the Raspberry Pi Imager. Your current options for installing Raspbian/Raspberry Pi OS are:
You can find some nice guides for getting started with setting up your new Pi at https://www.imore.com/how-get-started-using-raspberry-pi and https://lifehacker.com/the-always-up-to-date-guide-to-setting-up-your-raspberr-1781419054
You can install Rapbian using NOOBS by following the guide here, for example: https://www.youtube.com/watch?v=RQ6JvnXwDCM or using NOOBS Lite as shown here: https://www.youtube.com/watch?v=jsi50bCo_W4
The current way to install the Raspberry Pi OS is to use the Raspberry Pi Imager to install it directly. You can also download and manually install an operating system image on your Pi by getting the appropriate image from here: https://www.raspberrypi.com/software/operating-systems/
OLD: If NOOBS causes issues for you, however, one alternative might be to just install Raspbian directly without NOOBS. In order to install Raspbian, you'll need to download Raspbian from https://www.raspberrypi.org/downloads/raspbian/ and then flash Raspbian to an SD card using a tool like Etcher, as shown here: https://raspberrypi.stackexchange.com/a/51779 Finally, you can follow the setup directions for Raspbian Lite as outlined here, as well: https://www.raspberrypi.org/forums/viewtopic.php?t=133691
Dexter Industries has their own version of Raspbian called Raspbian for Robots, as shown here: https://www.dexterindustries.com/raspberry-pi-robot-software/
Once you've installed Raspbian/Raspberry Pi OS, you can then go on and install the GrovePi hardware and software separately. For the initial setup, at least as of December 2022,Raspberry Pi OS distro of Buster seems to be a good working setup as the alternative distro, Raspbian for Robots, works for the hardware but might need significant tweaking for Node-Red since it comes with Node.JS version 10.x and npm is not supported by earlier versions of Node.JS and, in general, Node.JS versions 14.x or higher are needed for npm and Node-Red.
If you happen to get an RPi4 instead of RPi3, some of the firmware updates might need to be modified to ensure the sensors work. If there's some persistent, ineffable hardware issue, please do check your RPi versions, as well.
If you'd still like to try for the RPi4, even with the above caveats, here are some tips/hints:
Here are the steps for setting up GrovePi+ with Raspberry Pi 4 (RPi4):
Reference for Dexter GrovePi+ drivers/firmware installation: https://www.dexterindustries.com/GrovePi/get-started-with-the-grovepi/setting-software/
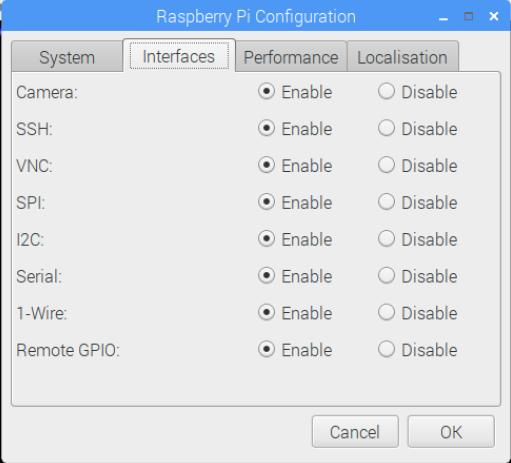
If you're more advanced, you can even setup your pi in headless mode so you won't need a monitor. You can setup networking by initially using an ethernet cable and then SSH'ing into it to setup wifi, as well. In order to setup SSH, you'll likely need to go into raspi-config and enable the SSH server to allow access in headless mode or follow the directions below to do it when you first make the micro-SD card.
You'll need to do the following:
sudo git clone https://github.com/DexterInd/GrovePi and then doing sudo ./install.shsudo curl -kL dexterindustries.com/update_grovepi | bashYou can see a detailed guide on getting started from GrovePi here: https://www.dexterindustries.com/GrovePi/get-started-with-the-grovepi/
You can see specific Setting up the Software guide from Dexter Industries that includes very detailed instructions here: https://www.dexterindustries.com/GrovePi/get-started-with-the-grovepi/setting-software/
Finally, you can also reference the Dexter Industries GitHub repository and guide here: https://github.com/DexterInd/GrovePi
Here is a simple guide/overview of the RPi setup. You should either install RaspberryPi.ORG's Raspbian Stretch or install Dexter Industries' Raspbian for Robots.
The following guide is for Raspbian Stretch but the process is similar for Dexter Industries' Raspbian for Robots.
  diskutil list
  sudo diskutil eraseDisk FAT32 RASPBIAN MBRFormat /dev/disk2
OPTIONAL: For Auto WiFi: Create a file called wpa_supplicant.conf that contains the following in the root directory of the micro-SD card with the Raspbian image burned onto it:
country=us
update_config=1
ctrl_interface=/var/run/wpa_supplicant

network={
scan_ssid=1
ssid="SSIDHERE"
psk="PASSWORD"
}
Nota bene: you'll need a USB wifi adapter for this approach (for older
Pi's; newer Pi's have it built-in); you can
also just plug your ethernet cable directly if you don't have a USB
wifi adapter handy.
OPTIONAL: For Headless SSH: Also create a file called "ssh" on the micro-SD card in order to ssh in from remote as seen here: https://www.youtube.com/watch?v=JduFutbcBmE and https://www.raspberrypi.org/forums/viewtopic.php?t=206440 and https://www.raspberrypi.org/documentation/remote-access/ssh/ in order to have the RPi automatically connect to your WiFi and get into headless ssh mode
arp -awhere it might have a name like dex.lan or raspberrypi.home
ssh pi@192.168.1.33) or console using the default username/password
  Raspbian: pi/raspberry
  Raspbian for Robots: pi/robots1234
  Raspbian for Robots (older): pi/raspberry
passwd manuallysudo raspi-config and then choosing the option to expand the file systemsudo apt-get updatesudo apt-get install tightvncserversvncserver :1vncserver -kill :1~/.vnc/ and remove the password file
For Raspbian Stretch, you can install and run the GrovePi software by doing the following:
curl -kL dexterindustries.com/update_grovepi | bashas shown here: https://www.dexterindustries.com/GrovePi/get-started-with-the-grovepi/setting-software/
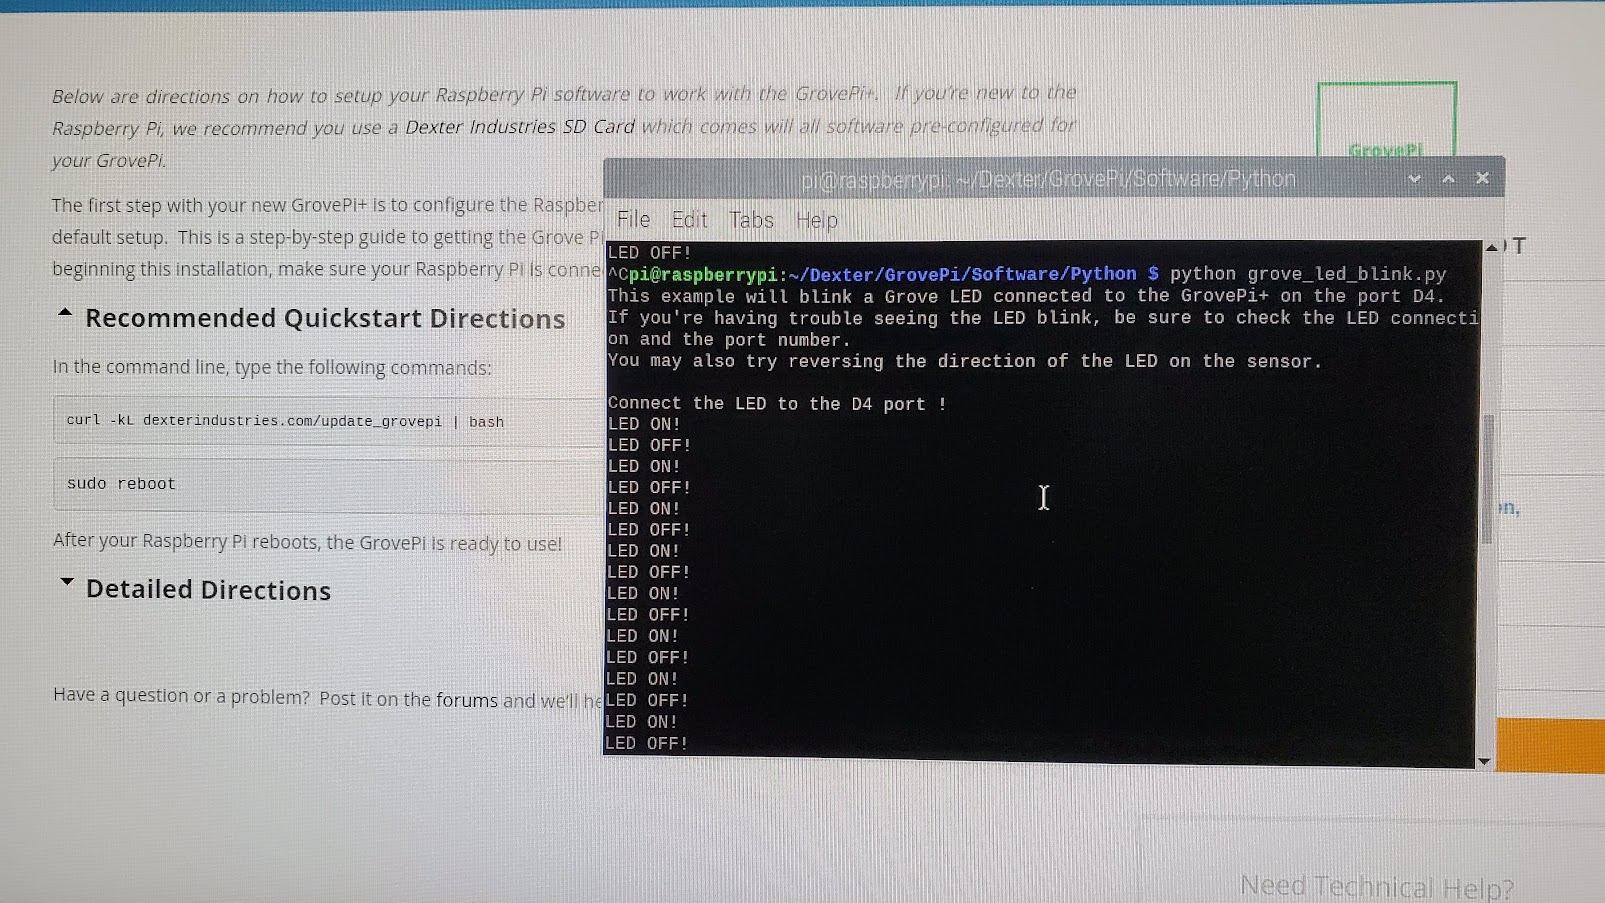
sudo /home/pi/Desktop/GrovePi/Firmware/firmware_update.sh as shown here: https://www.dexterindustries.com/GrovePi/get-started-with-the-grovepi/updating-firmware//home/pi/Dexter/GrovePi/Software/Python/grove_led_blink.py as shown here: https://www.dexterindustries.com/GrovePi/get-started-with-the-grovepi/setting-software/
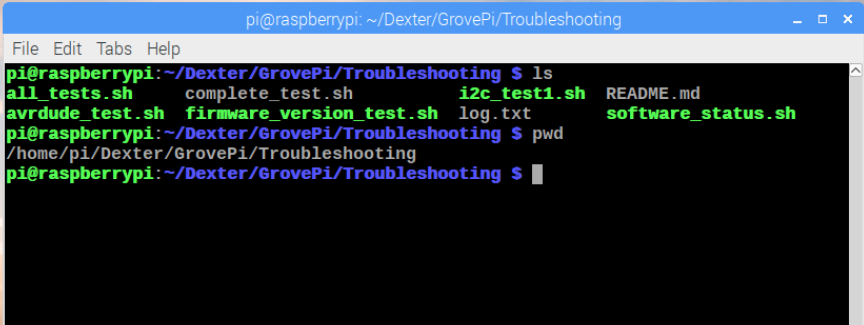
Run the Tests for your GrovePi system:
sudo /home/pi/Dexter/GrovePi/Troubleshooting/all_tests.sh
python3 /home/pi/Dexter/GrovePi/Projects/Home_Weather_Display/Home_Weather_Display.py
python instead of python3
You can also install Raspbian for Robots from Dexter Industries directly on your Pi following these directions for setting it up via an SD card.
NOTE: If you're running Raspbian for Robots, it's still on Jessie. In that case, please just click on the following icon to do an update:
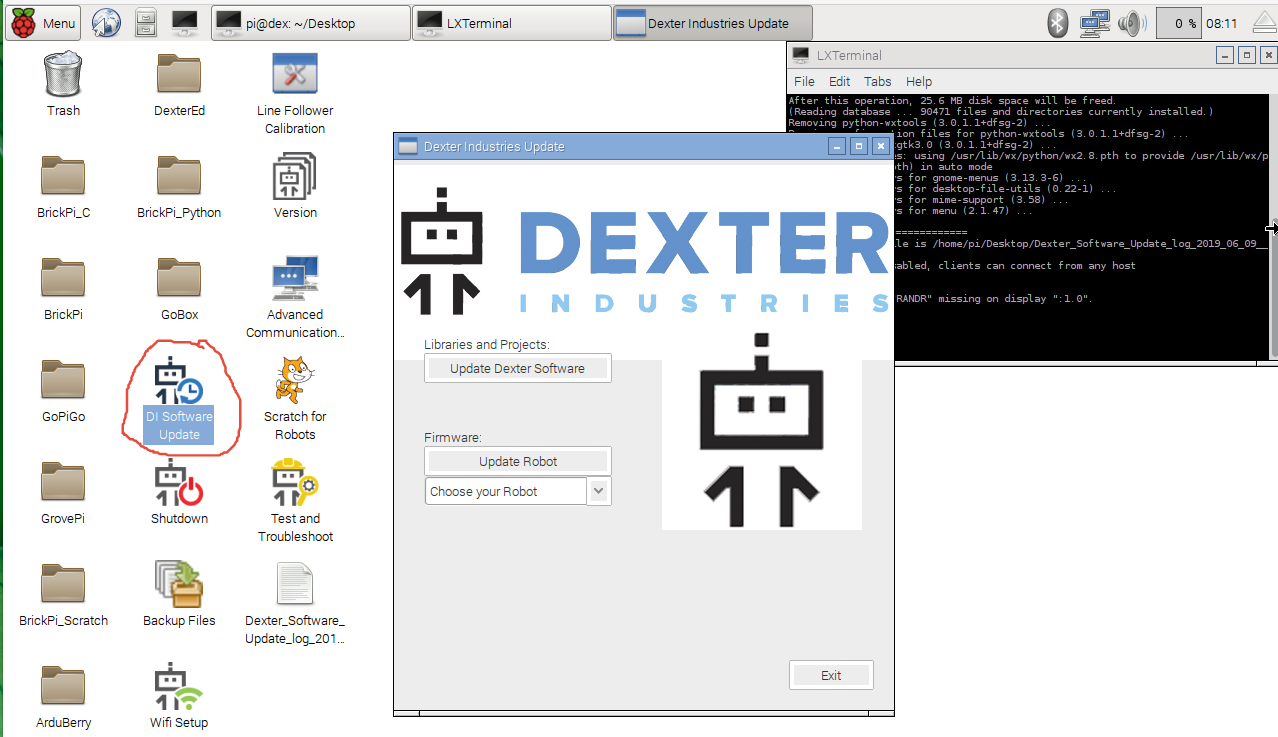
This icon refers to this shortcut:
pi@dex:~/Desktop $ more desktop_shortcut_update.desktop
[Desktop Entry]
Encoding=UTF-8
Version=1.0
Type=Application
Exec=lxterminal  --title "Update in Progress - Do not close this window!" --command "sudo" "bash" "/home/pi/di_update/Raspbian_For_Robots/update_master.sh"
Icon=/home/pi/di_update/Raspbian_For_Robots/desktop/DXT_Icon_64x64_Update.png
Terminal=false
Name=DI Software Update
Comment= Programming system and content development tool
Categories=Accessories;
This can be found on the Desktop. After you run this, please update both the Software and the Firmware for GrovePi using the same update tool.
sudo apt-get install python-numpy python-scipy python-matplotlib ipython ipython-notebook python-pandas python-sympy python-noseas seen here: https://www.scipy.org/install.html. You might need to update Python to 3.5 or higher first, as shown here: http://www.knight-of-pi.org/installing-python3-6-on-a-raspberry-pi/
sudo apt-get install python3-dev libffi-dev libssl-dev -y
wget https://www.python.org/ftp/python/3.6.3/Python-3.6.3.tar.xz
tar xJf Python-3.6.3.tar.xz
cd Python-3.6.3
./configure
make
sudo make install
sudo pip3 install --upgrade pip
Anything about 3.5 should suffice as it's needed for GPIO. After updating, you might have to link /usr/local/bin/python3 to /usr/bin/python3 as the latter might still be pointing to an older, python 3.4 or some other lower than 3.5.
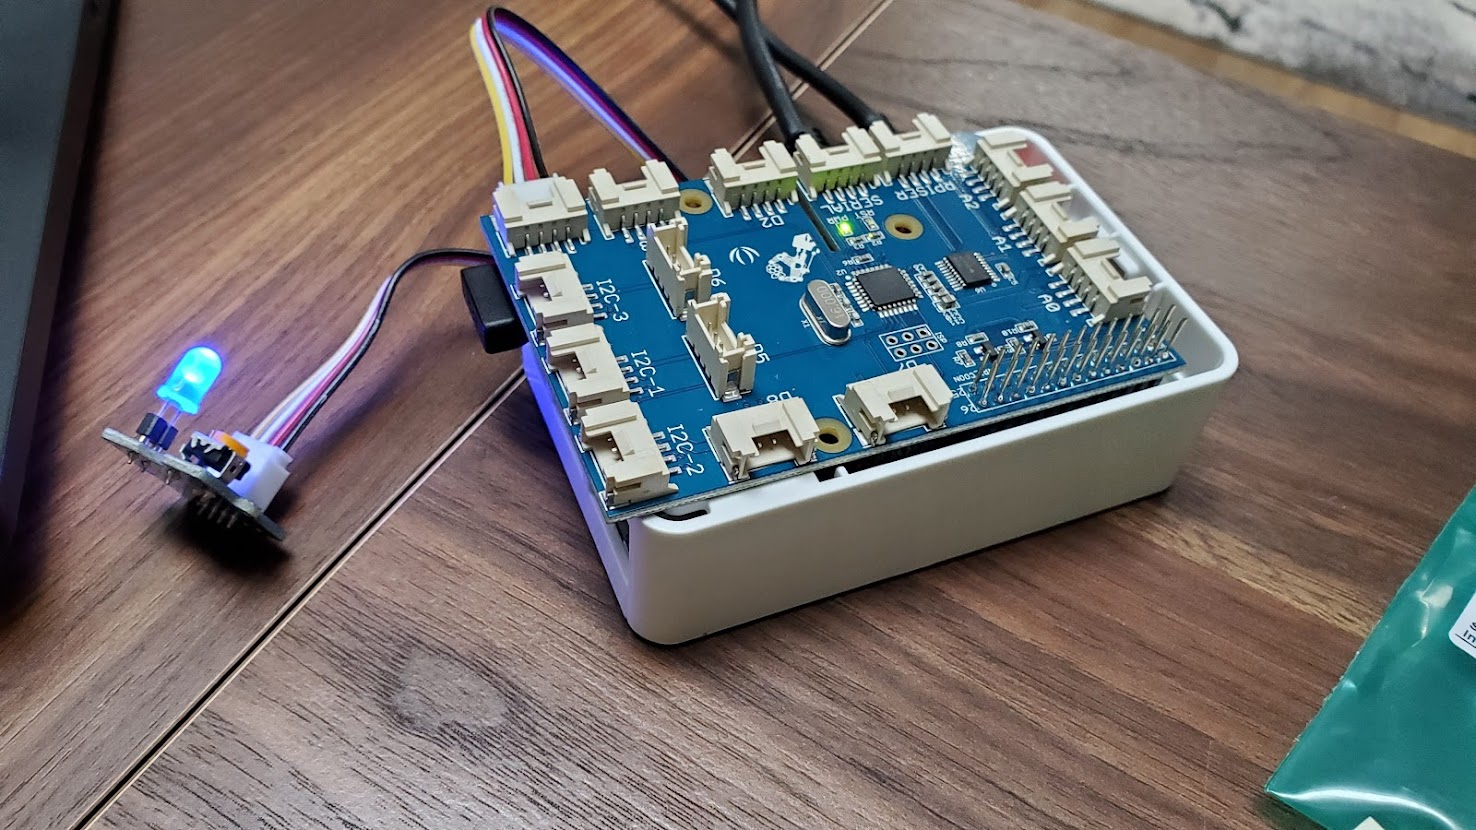
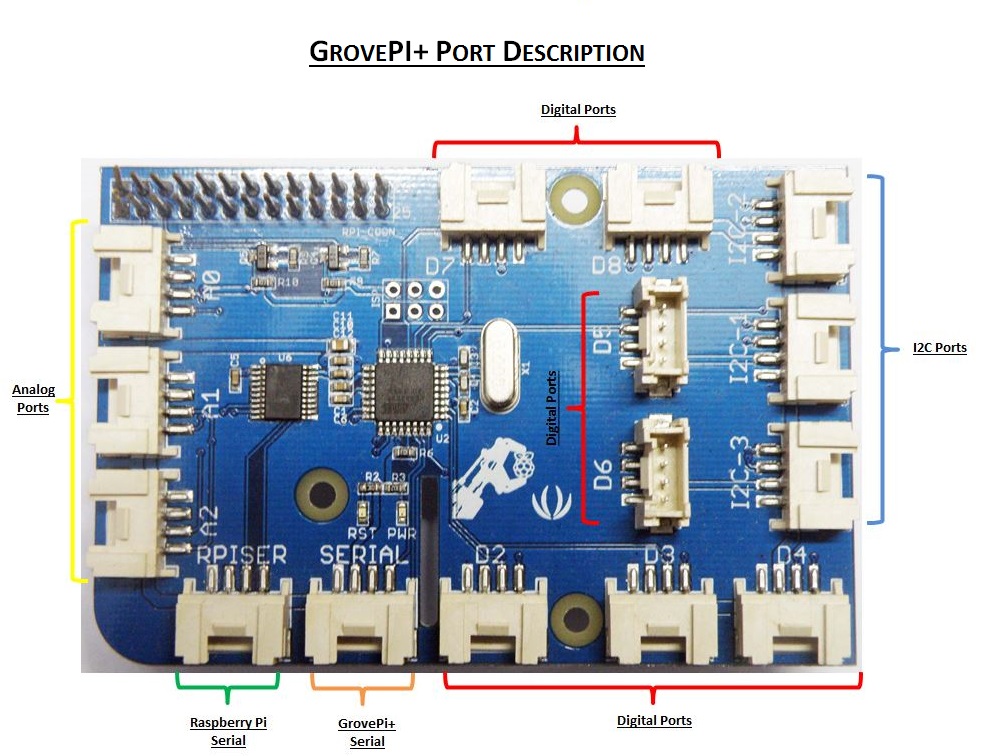
The GrovePi has Analog input, Digital input/output, and I2C output ports as shown below and detailed http://thinglabs.io/workshop/thingy-4-windows/grovepi/ and https://www.dexterindustries.com/GrovePi/engineering/port-description/
The sensors and actuators included in the GrovePi+ Starter Kit can be classified as follows:
| Type | Direction | Examples | GrovePi API Calls |
|---|---|---|---|
| Analog | Input | Light sensor, Temperature sensor, Rotary Angle sensor, Sound sensor | SensorValue() |
| Digital | Input | Button, Ultrasonic Range sensor | CurrentState(), MeasureInCentimeters() |
| Digital | Output | LED, Buzzer, Relay | ChangeState(SensorStatus) |
| I2C | Output | RGB LCD Display | SetBackLightRgb(r,g,b), SetText(string) |
This is also shown in the image below:
So if you were to connect the Digital Humidity and Temperature (DHT) sensor and the LCD Output Screen, you'd hook it up to the GrovePi as below, with the DHT on a Digital Port (here, D7) and the LCD on an I2C port (here, I2C-2):

This is also detailed here: https://www.dexterindustries.com/GrovePi/projects-for-the-raspberry-pi/raspberry-pi-temperature-sensor/
The other thing to add in would be an LED bulb (like Red or Green or Blue) on a Digital port like D4 so you can do the default test of grove_led_blink.py (https://github.com/DexterInd/GrovePi/blob/master/Software/Python/grove_led_blink.py)
If you're using the Seeed kit, you might get the Grove Base HAT rather than the GrovePi Plus boards. Raspberry Pi introduced a "Hardware Attached on Top" (HAT) hardware specification for add-on modules starting with the Raspberry Pi model B+. These HAT add-on modules have some advantages over the older add-on module specifications, including auto-configuration. You can find out more about the new HATs at https://github.com/raspberrypi/hats and https://www.tomshardware.com/how-to/raspberry-pi-sense-hat-projects-for-kids
Specifically, here is a guide on how to mount a Grove Base Hat for Raspberry Pi, including installing the Seeed grove.py software here: https://geraldonit.com/2020/01/12/how-to-mount-a-grove-base-hat-for-raspberry-pi/
Finally, here are some helpful links for the Grove Base HAT:
If you're interested in what some would consider lower level programming guides, you can find them here:
https://www.dexterindustries.com/GrovePi/programming/python-library-documentation/
You can also poke around the code base on GitHub here:
https://github.com/DexterInd/GrovePi
Finally, here are some additional links:
Once you connect the GrovePi and the DHT-11 sensor, you might run into the following issue: if your initial run of the program results in the display showing -1 for both temperature and humidity (-1,-1), you should likely start by upgrading the firmware using the bash script found on the GrovePi board included in the installed software, as discussed here: https://forum.dexterindustries.com/t/raspi-grovepi-temperature-humidity-sensor-showing-1-1/3662/14
You can check your firmware versions as follows:
pi@iot1:~/GrovePi/Software/Python $ pwd
/home/pi/GrovePi/Software/Python
pi@iot1:~/GrovePi/Software/Python $ ls *version*
grove_firmware_version_check.py
pi@iot1:~/GrovePi/Software/Python $ sudo python grove_firmware_version_check.py
GrovePi has firmware version: 1.2.7
This thread seems to explain a little of the why a firmware upgrade with subsequent grovepi reinstallation:
https://forum.dexterindustries.com/t/solved-dht-sensor-responding-1/2815/4
I suspect some of the manufacturers are not up to speed with Raspian/Debian Stretch. Anyway, for those that may still have this problem the following is what I did to reconcile my system:
Note: $DEXTER_HOME on my system is /home/pi/Dexter. Some may have it as /home/pi/Desktop
#update firmware
cd $DEXTER_HOME/GrovePi/Firmware sudo bash firmware_update.sh
sudo bash firmware_update.sh
# re-set up grove pi
cd Desktop/GrovePi/Script
sudo bash install.sh
sudo reboot
And, of course, after you do any such upgrade, you should reboot and try the following steps as needed the basic troubleshooting to verify the hardware:
The data coming from the sensor might also have sporadic NaN (Not a Number) errors, as discussed here: https://forum.dexterindustries.com/t/grove-temperature-and-humidity-sensor-nan-value/408/5
The simplest solution to fix this might be to read the sensor, check the return values for NaN, and if there aren't any NaN values, then update the screen. Reducing the polling time can also help reduce the NaN errors so you can change that to 0.5 seconds or some such using the sleep() function, as in time.sleep(0.5) or time.sleep(5), which should catch them all (or 15 seconds if the 5 second timeout doesn't work!).
You might notice the screen sometimes not blanking upon KeyboardInterrupt even though the comments in the code indicate it should. Usually, the blink led program should turn off the led, so if you compare the two, you should find that blink led uses time.sleep and Home_Weather_Display uses sleep. Switching to time.sleep seems to allow the KeyboardInterrupt to be thrown/caught when in time.sleep whereas the KeyboardInterrupt when in sleep was eaten by sleep and not passed along.
If you think it would make more sense to turn the display off when exiting, you can add a line for that to the except KeyboardInterrupt.
If you try to run the setup.py as in the directions (in the software → Python), you might get an error like this:
PermissionError: [Errno 13] Permission denied: '.tmp_modules'
You can use the quick install command from https://github.com/DexterInd/GrovePi by using the following:
curl -kL dexterindustries.com/update_grovepi | bash
This should do some updates and a reboot and get it working. If it doesn't, you can try the Raspbian for Robots approach below!
Another thing that might help is a GrovePi customized version of Raspbian. GrovePi maintains its own version of Raspbian called Raspbian for Robots, as shown here: https://www.dexterindustries.com/raspberry-pi-robot-software/
So you can install Raspbian for Robots directly on an SD Card using the following guide: https://www.dexterindustries.com/howto/install-raspbian-for-robots-image-on-an-sd-card/
To install via an SD card, you can use Etcher to load your IMG image file onto the SD Card, as shown here: https://www.raspberrypi.org/documentation/installation/installing-images/ and here https://www.youtube.com/watch?v=dRvHynxGjJQ
If you subsequently upgrade the Raspbian for Robots installation, it might break the connection to the sensor and give you -1's again. If it does so, please do revert back to the original Raspbian for Robots image.
If you are unable to access the DHT-11 (the blue temp/humidity sensor) that came with the GrovePI+ kit, here is a potential workaround in which you can put the Raspbian for Robots directly on the SD card. Here is what I had to do in order to get this to work. Keep in mind that I have a Raspberry Pi 3+ (the newest edition) so support for this newer hardware with the GrovePI+ will vary.
As you get to Modules 4 and 5, you have to download new packages and might run into disk space issues. For example, if you're i Module 4 and download Postman, you'll likely see the 'out of disk space' messages, which might be confusing if your SD card is 32gb or so like the default one.
It turns out that Etcher, the ISO burner, creates two partitions, the primary, which is only 40-something MBs, and the secondary, which gets all the rest of the space. The only problem is that this space might not be recognized by Raspbian for Robots and would not be usable then.
To make use of the rest of the space on the SD, please follow the instructions in this link:
https://www.dexterindustries.com/howto/install-raspbian-for-robots-image-on-an-sd-card/
Select "Your First Time Running the New SD Card"
The more painful way might be to use a Linux desktop and use gparted to fix the SD card by resizing the partition to use the full 32gb disk.
sudo python Home_Weather_Display.py gives you an error on Line 51 where you call setRGB() like an IOError 110 (connection timed out) or IOError 121 (Remote I/O Error), that probably means you need to check the hardware, if it's seated properly, connected properly, soldered properly, etc. The i2cdetect command can also help in these cases. Please do check these links for more info about that:
sudo i2cdetect -y 1, as detailed here, as well: https://forum.dexterindustries.com/t/home-weather-display-error/3580
Here is a wonderful guide on how to use i2c on the pi in
the context of the compass module and the ultrasonic range module and
how you can use i2cdetect -y 0 to see what devices are
connected to what addresses:
https://www.instructables.com/id/Raspberry-Pi-I2C-Python/
If you keep getting dependency errors with updates, you might want to do a full upgrade of your distro. You might be confused by the various ways to do so but they are:
apt-get upgrade will only upgrade
currently-installed packagesapt upgrade will upgrade currently-installed
packages and install new packages pulled in by updated
dependenciesdist-upgrade and full-upgrade variants
will upgrade currently-installed packages, install new packages
introduced as dependencies, and remove packages which are broken by
upgraded packages
apt
full-upgrade
or apt-get
dist-upgrade where "full-upgrade" is about removing
installed packages when necessary, while "dist-upgrade" is about
"intelligently handling changing dependencies with new versions of
packages"In practice, apt upgrade is safer
than apt-get upgrade (by default) because it
allows updated kernels to be installed automatically. If you like, you
can do both sudo apt full-upgrade and then a
sudo apt-get dist-upgrade, as well.
After you've installed the GrovePi+ software and have the LED working (e.g., by following http://www.dexterindustries.com/GrovePi/get-started-with-the-grovepi/setting-software/, perhaps after swapping the pins), you can run the Home Weather Display project at https://www.dexterindustries.com/GrovePi/projects-for-the-raspberry-pi/raspberry-pi-temperature-sensor/ (which redirects to https://edu.workbencheducation.com/cwists/preview/26753x, and here's the old link: old-link ).
Once you're ready to modify the program, you'll likely have to first change into the main Projects directory. Instead of finding it on your Desktop, a la:
cd ~/Desktop/GrovePi/Projects/Home_Weather_Display
you might instead have the project directory in your home directory, a la:
cd /home/pi/Dexter/GrovePi/Projects/Home_Weather_Display
Once you change directory to the appropriate location, you'll be ready to start modifying the Python script!
You might have issues arise when you change the type of the temperature to a float. E.g., you might have been able to change the LCD color based on temp when the tempF variable was an 'int'. However, if you change it over to a float and it no longer evaluates and changes the screen, you can fix that by converting it to a string instead. Python is a little more stubborn with regards to typecasting. Also I think the include that we are getting setText_norefresh from is eating an error, but I haven't looked yet, it makes this hard to figure out though for sure.
If you convert the floats to strings it works OK though, so instead of:
setText_norefresh("Temp:" + t + "F\n" + "Humidity :" + h + "%")
Try:
setText_norefresh("Temp:" + str(t) + "F\n" + "Humidity :" + str(h) + "%")